Bevor ein Bild offiziell zur cloud recognition (CRS)-Bildergalerie hinzugefügt wird, ist es Best Practice, seine Qualität vorab zu bewerten.
Wenn der erkennbare Bereich des Zielbildes zu klein ist, etwa eine weiße Wand oder ein einfarbiger Block, oder wenn die Textur zu einfach ist, sinkt die Erkennungsrate erheblich. Dieses Kapitel beschreibt den CRS-Bewertungsmechanismus im Detail und hilft Ihnen, hochwertige AR-Erkennungsmaterialien auszuwählen.
Wir konzentrieren uns hauptsächlich auf die folgenden zwei Gesamtmetriken. Beide verfügen über separate API-Endpunkte, die eine Gesamtbewertung liefern:
Diese Metriken bewerten das Bild aus Sicht der Bildalgorithmen, und jede Metrik wird weiterhin je nach Schwierigkeit von 0 bis 4 angegeben.
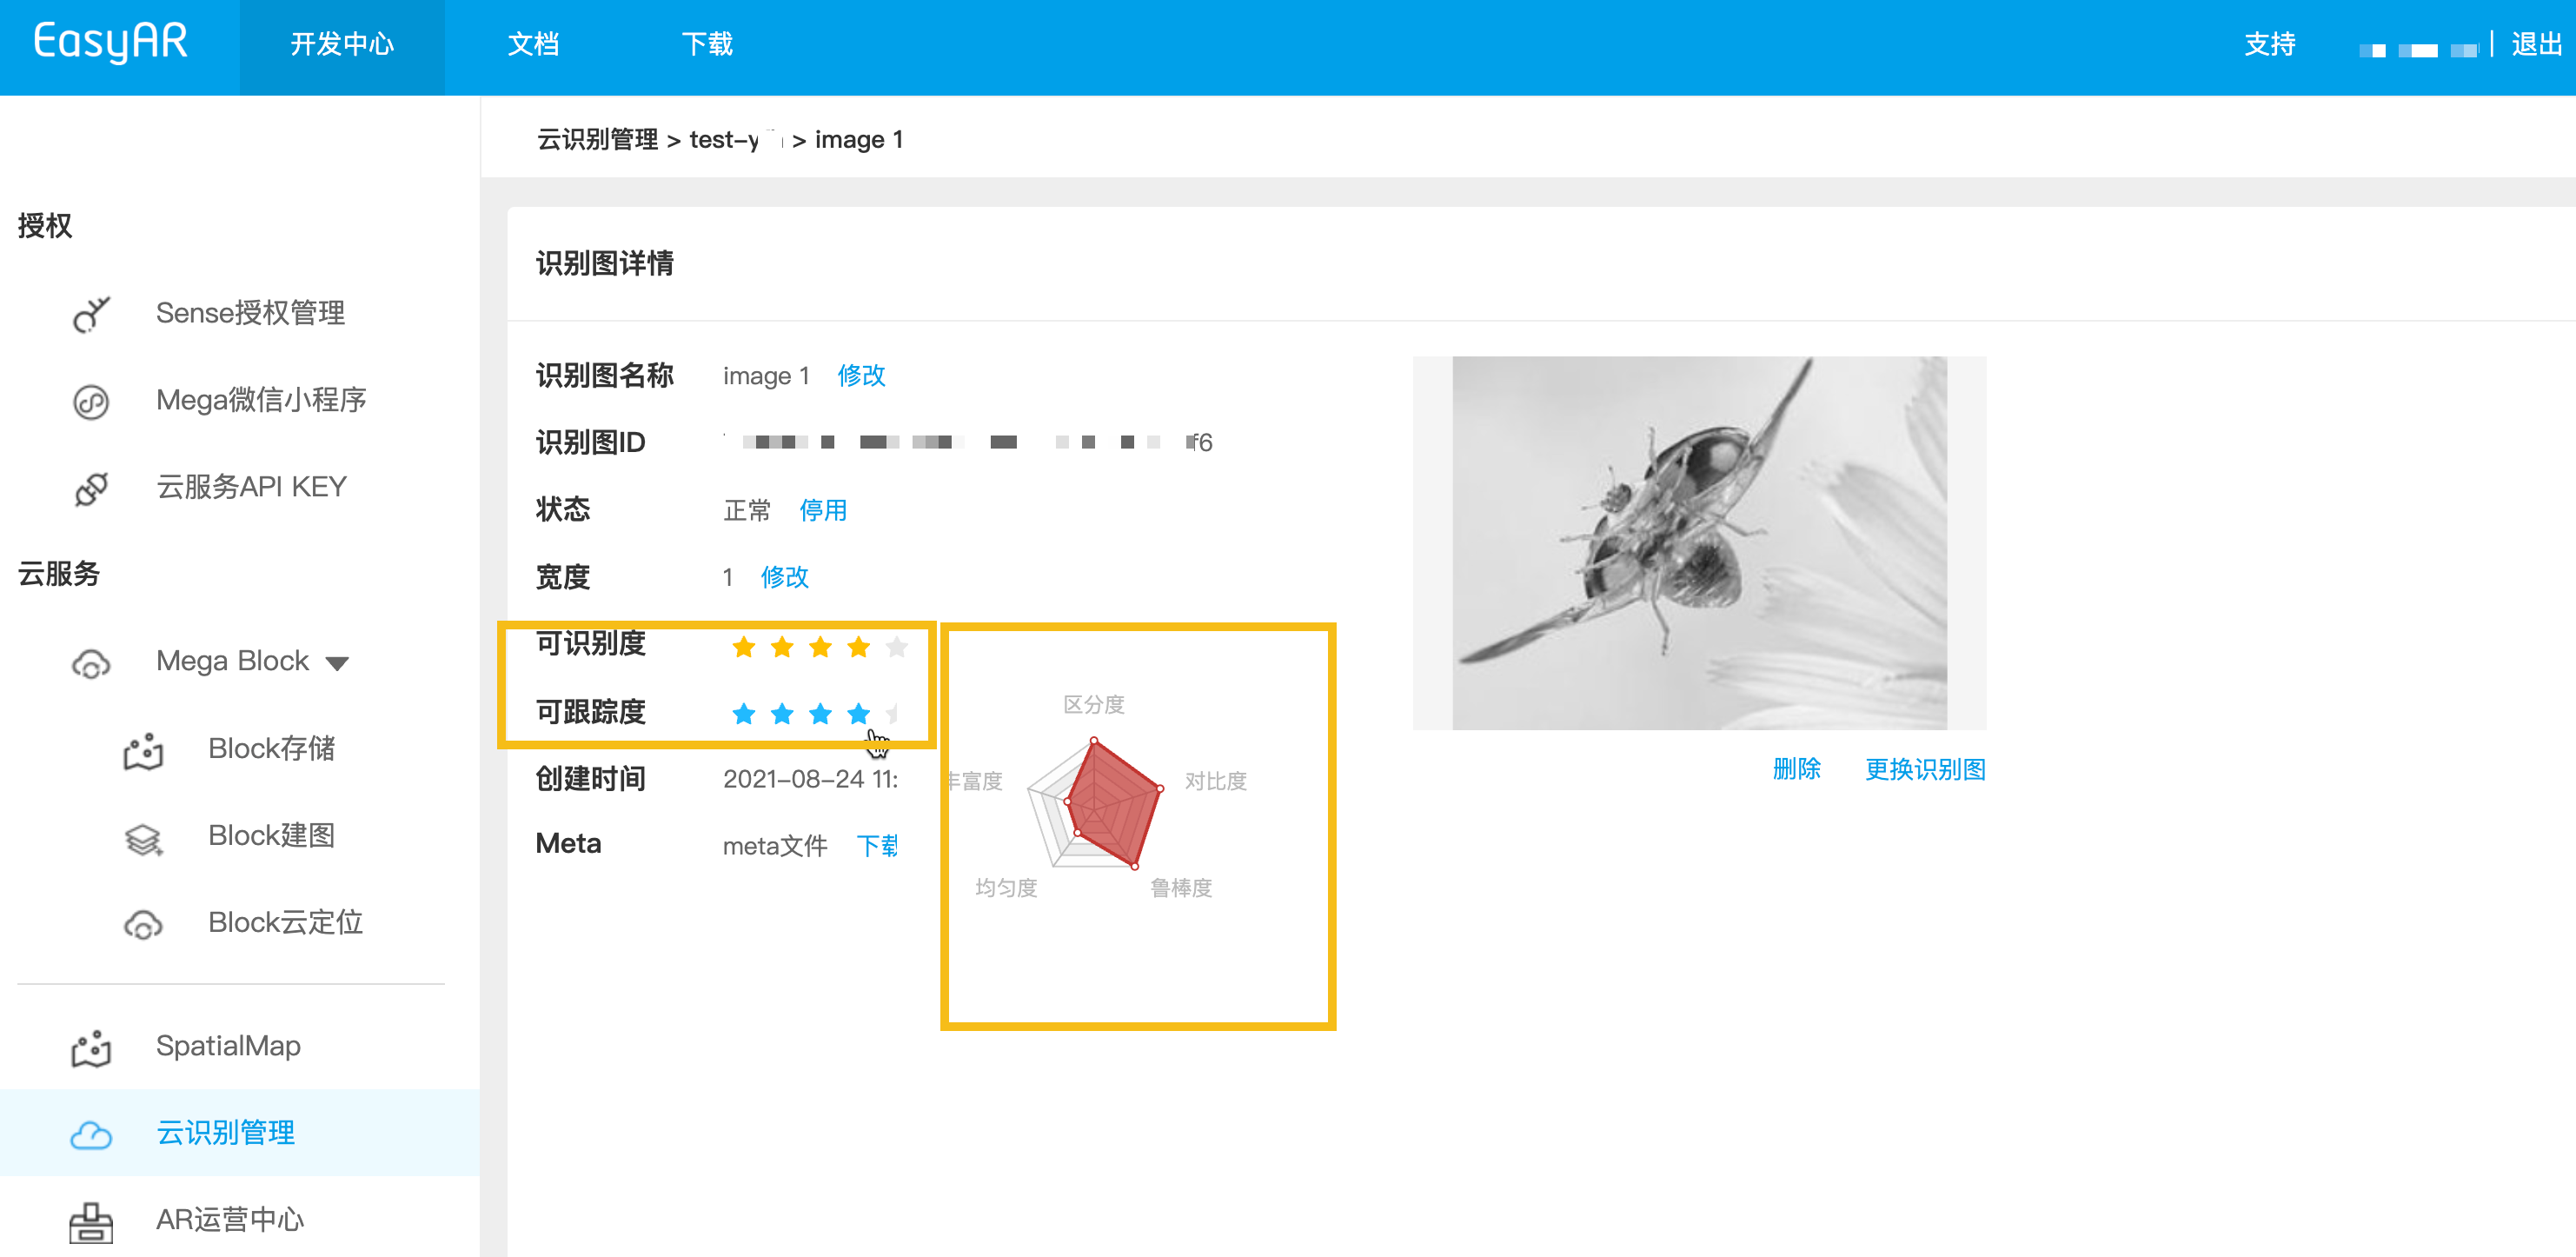
Jedes Zielbild in der Datenbank enthält in seinen Details eine detaillierte Bewertung. Sie können Zielbildeigenschaften über die API abrufen und anzeigen. Sie können sie auch über EasyAR cloud recognition management anzeigen.
Wie in der Abbildung dargestellt, enthält die Detailseite zwei zentrale Gesamtmetriken, und ein Fünfeck zeigt fünf Detailmetriken.
Beim Aufbau eines automatisierten Upload-Backends wird empfohlen, den Bewertungsendpunkt vor dem offiziellen Upload aufzurufen.
- Konvertieren Sie zuerst das lokale Target-Bild in Base64 (macOS / Linux) und speichern Sie das Ergebnis in image_base64.txt
base64 -i ./target.jpg | tr -d '\n' > image_base64.txt
- Ersetzen Sie die Platzhalter durch die tatsächlichen Parameter und führen Sie das curl-Skript aus
- Your-Server-side-URL → tatsächlicher API Host
- Your-Token → tatsächlicher API Key Authorization Token
- Your-CRS-AppId → Ihre appId
curl -X POST "https://<Your-Server-side-URL>/grade/detail" \
  -H "Content-Type: application/json" \
  -H "Authorization: <YOUR-TOKEN>" \
  -d '{
    "appId": "<Your-CRS-AppId>",
    "image": "'"$(cat image_base64.txt)"'"
  }'
Java-Beispielcode herunterladen
Projekt über Maven importieren
Step 1. Öffnen Sie die zugehörige Codedatei Grade.java
Step 2. Ändern Sie die globalen Variablen und ersetzen Sie sie durch die Authentifizierungsparameter aus Ihrer Vorbereitungsliste
- CRS AppId
- API Key / API Secret
- Server-end URL
- IMAGE_PATH: hochzuladende Zielbilddatei
import okhttp3.*;
import org.json.JSONObject;
import java.io.IOException;
import java.nio.file.Files;
import java.nio.file.Path;
import java.nio.file.Paths;
import java.util.Base64;
import java.util.HashMap;
import java.util.Map;

public class Grade {
    private static final String TARGET_MGMT_URL = "http://cn1.crs.easyar.com:8888";
    private static final String CRS_APPID       = "--here is your CRS AppId--";
    private static final String API_KEY         = "--here is your API Key--";
    private static final String API_SECRET      = "--here is your API Secret--";
    private static final String IMAGE_PATH      = "test_target_image.jpg";

    enum GradeType {
        DETAIL,
        DETECTION,
        TRACKING
    }
    private static final Map<GradeType, String> GRADE_URL = new HashMap<GradeType, String>(){
        {
            put(GradeType.DETAIL,    "/grade/detail") ;
            put(GradeType.DETECTION, "/grade/detection") ;
            put(GradeType.TRACKING, "/grade/tracking") ;
        }
    };

    public String grade(Auth auth, String imgPath, GradeType gradeType) throws IOException {
        final Path mImagePath   = Paths.get(imgPath);
        JSONObject params = new JSONObject().put("image", Base64.getEncoder().encodeToString(
                Files.readAllBytes(mImagePath)
        ));
        Auth.signParam(params, auth.getAppId(), auth.getApiKey(), auth.getApiSecret());
        RequestBody requestBody = FormBody.create(MediaType.parse("application/json; charset=utf-8")
                , params.toString());
        Request request = new Request.Builder()
                .url(auth.getCloudURL() + GRADE_URL.get(gradeType))
                .post(requestBody)
                .build();
        return new OkHttpClient.Builder().build().newCall(request).execute().body().string();
    }

    public static void main(String[] args) throws IOException {
        Auth accessInfo  =  new Auth(CRS_APPID, API_KEY, API_SECRET, TARGET_MGMT_URL);

        System.out.println("================== grade details ==================");
        System.out.println(new Grade().grade(accessInfo, IMAGE_PATH, GradeType.DETAIL));

        System.out.println("================== grade for detection ==================");
        JSONObject gradeResp = new JSONObject(new Grade().grade(accessInfo, IMAGE_PATH, GradeType.DETECTION));
        System.out.println("Detection grade: " + gradeResp.getJSONObject(Common.KEY_RESULT).get(Common.KEY_GRADE));

        System.out.println("================== grade for tracking =================== ");
        gradeResp = new JSONObject(new Grade().grade(accessInfo, IMAGE_PATH, GradeType.TRACKING));
        System.out.println("Tracking grade: " + gradeResp.getJSONObject(Common.KEY_RESULT).get(Common.KEY_GRADE));
    }
}
Step 3. Main ausführen
Laden Sie den NodeJS sample code herunter
Step 1. Konfigurieren Sie die key file keys.json
- CRS AppId
- API Key / API Secret
{
  "appId": "--here is your appId for CRS App Instance for SDK 4--",
  "apiKey": "--here is your api key which is create from website and which has crs permission--",
  "apiSecret": "--here is your api secret which is create from website--"
}
Step 2. Ausführen, dabei test image, key file und Server-end URL angeben
node bin/grade test.jpeg -t <Server-end-URL> -c keys.json
var argv = require('yargs')
    .usage('Usage: $0 [image] -t [host] -c [keys]')
    .demand(1)
    .default('t', 'http://localhost:8888').alias('t', 'host')
    .default('c', 'keys.json').alias('c', 'keys')
    .help('h').alias('h', 'help')
    .epilog('copyright 2015, sightp.com')
    .argv;

var fs = require('fs');

var imageFn = argv._[0];
var host = argv.host;
var keys = JSON.parse(fs.readFileSync(argv.keys));

var farmer = require('../farmer')(host, keys);

farmer.getTrackingGrade({
    'image': fs.readFileSync(imageFn).toString('base64')
})
.then(function(resp) {
    console.log(resp);
})
.fail(function(err) {
    console.log(err);
});
Laden Sie den PHP-Beispielcode herunter
Step 1. Offnen Sie den Einstiegscode demo.php
Step 2. Andern Sie die globalen Variablen und ersetzen Sie sie durch die Authentifizierungsparameter aus Ihrer vorbereiteten Liste
- CRS AppId
- API Key / API Secret
- Server-end URL
- imageFilePath : Pfad der hochzuladenden Zielbilddatei
<?php
include 'EasyARClientSdkCRS.php';
$apiKey = 'API Key';
$apiSecret = 'API Secret';
$crsAppId = 'CRS AppId'
$crsCloudUrl = 'https://cn1-crs.easyar.com';
$imageFilePath = '1.jpg'

$sdk = new EasyARClientSdkCRS($apiKey, $apiSecret, $crsAppId, $crsCloudUrl);

$image = base64_encode(file_get_contents($imageFilePath));
$rs = $sdk->detection($image);
if ($rs->statusCode == 0) {
  print_r($rs->result->grade);
} else {
  print_r($rs);
}
Step 3. Fuhren Sie php demo.php aus
Erstellen Sie die zugehörige Codedatei grade.py, ändern Sie die global variables und führen Sie dann aus
pip install requests
python grade.py
import time
import hashlib
import requests
import base64

# --- Global Configuration ---
API_KEY = "YOUR_API_KEY"
API_SECRET = "YOUR_API_SECRET"
APP_ID = "YOUR_APP_ID"
HOST = "https://crs-cn1.easyar.com"
IMAGE_PATH = "test.jpg"

def main():
    # 1. Read and encode image
    with open(IMAGE_PATH, "rb") as f:
        image_base64 = base64.b64encode(f.read()).decode('utf-8')

    timestamp = str(int(time.time() * 1000))

    # 2. Build parameter dictionary (including image)
    params = {
        'apiKey': API_KEY,
        'appId': APP_ID,
        'timestamp': timestamp,
        'image': image_base64
    }

    # 3. Sort by key and concatenate
    sorted_keys = sorted(params.keys())
    builder = "".join([f"{k}{params[k]}" for k in sorted_keys])
    builder += API_SECRET

    # 4. Generate SHA256 Signature
    signature = hashlib.sha256(builder.encode('utf-8')).hexdigest()

    # 5. Send POST request
    payload = {**params, "signature": signature, "timestamp": int(timestamp)}
    response = requests.post(f"{HOST}/grade/detection", json=payload)

    print(f"Status: {response.status_code}")
    print(f"Response: {response.text}")

if __name__ == "__main__":
    main()
Erstellen Sie die zugehörige Codedatei main.go, ändern Sie die globalen Variablen und führen Sie dann aus:
go run main.go
main.go:
package main

import (
  "bytes"
  "crypto/sha256"
  "encoding/base64"
  "encoding/json"
  "fmt"
  "io"
  "net/http"
  "os"
  "sort"
  "strconv"
  "time"
)

var (
  ApiKey    = "YOUR_API_KEY"
  ApiSecret = "YOUR_API_SECRET"
  AppId     = "YOUR_APP_ID"
  Host      = "https://crs-cn1.easyar.com"
  ImagePath = "test.jpg"
)

func main() {
  fileData, _ := os.ReadFile(ImagePath)
  imgBase64 := base64.StdEncoding.EncodeToString(fileData)

  tsInt := time.Now().UnixNano() / 1e6
  tsStr := strconv.FormatInt(tsInt, 10)

  params := map[string]string{
    "apiKey":    ApiKey,
    "appId":     AppId,
    "timestamp": tsStr,
    "image":     imgBase64,
  }

  keys := make([]string, 0, len(params))
  for k := range params { keys = append(keys, k) }
  sort.Strings(keys)

  var builder bytes.Buffer
  for _, k := range keys {
    builder.WriteString(k)
    builder.WriteString(params[k])
  }
  builder.WriteString(ApiSecret)

  signature := fmt.Sprintf("%x", sha256.Sum256(builder.Bytes()))

  payload := map[string]interface{}{
    "image":     imgBase64,
    "apiKey":    ApiKey,
    "appId":     AppId,
    "timestamp": tsInt,
    "signature": signature,
  }
  jsonBytes, _ := json.Marshal(payload)

  resp, _ := http.Post(Host+"/grade/detection", "application/json", bytes.NewBuffer(jsonBytes))
  defer resp.Body.Close()
  body, _ := io.ReadAll(resp.Body)
  fmt.Printf("Response: %s\n", string(body))
}
Fügen Sie die Abhängigkeiten reqwest, tokio, sha2 und hex in Cargo.toml hinzu.
Führen Sie cargo run aus.
use sha2::{Sha256, Digest};
use std::collections::BTreeMap;
use std::time::{SystemTime, UNIX_EPOCH};
use base64::{Engine as _, engine::general_purpose};
const API_KEY: &str = "YOUR_API_KEY";
const API_SECRET: &str = "YOUR_API_SECRET";
const APP_ID: &str = "YOUR_APP_ID";
const HOST: &str = "https://crs-cn1.easyar.com";
const IMAGE_PATH: &str = "test.jpg";
#[tokio::main]
async fn main() -> Result<(), Box<dyn std::error::Error>> {
let img_bytes = std::fs::read(IMAGE_PATH)?;
let img_b64 = general_purpose::STANDARD.encode(img_bytes);
let ts_raw = SystemTime::now().duration_since(UNIX_EPOCH)?.as_millis();
let ts_str = ts_raw.to_string();
// 1. Collect params in BTreeMap for automatic sorting
let mut params = BTreeMap::new();
params.insert("apiKey", API_KEY);
params.insert("appId", APP_ID);
params.insert("timestamp", &ts_str);
params.insert("image", &img_b64);
// 2. Build sign string
let mut builder = String::new();
for (k, v) in ¶ms {
builder.push_str(k);
builder.push_str(v);
}
builder.push_str(API_SECRET);
// 3. Hash
let mut hasher = Sha256::new();
hasher.update(builder.as_bytes());
let signature = hex::encode(hasher.finalize());
let mut body = serde_json::Map::new();
body.insert("image".into(), img_b64.into());
body.insert("apiKey".into(), API_KEY.into());
body.insert("appId".into(), APP_ID.into());
body.insert("timestamp".into(), ts_raw.into());
body.insert("signature".into(), signature.into());
let client = reqwest::Client::new();
let res = client.post(format!("{}/grade/detection", HOST))
.json(&body)
.send()
.await?;
println!("Response: {}", res.text().await?);
Ok(())
}
Erstellen Sie ein .NET-Konsolenprojekt.
dotnet new console
dotnet run
using System;
using System.Collections.Generic;
using System.IO;
using System.Linq;
using System.Security.Cryptography;
using System.Text;
using System.Net.Http;
using System.Text.Json;

class Program {
    static string API_KEY = "YOUR_API_KEY";
    static string API_SECRET = "YOUR_API_SECRET";
    static string APP_ID = "YOUR_APP_ID";
    static string HOST = "https://crs-cn1.easyar.com";
    static string IMAGE_PATH = "test.jpg";

    static async System.Threading.Tasks.Task Main() {
        string timestamp = DateTimeOffset.Now.ToUnixTimeMilliseconds().ToString();
        string imageBase64 = Convert.ToBase64String(File.ReadAllBytes(IMAGE_PATH));

        // 1. Prepare data for signing
        var data = new SortedDictionary<string, string> {
            { "apiKey", API_KEY },
            { "appId", APP_ID },
            { "timestamp", timestamp },
            { "image", imageBase64 }
        };

        // 2. Concatenate keys and values
        StringBuilder sb = new StringBuilder();
        foreach (var pair in data) sb.Append(pair.Key).Append(pair.Value);
        sb.Append(API_SECRET);

        string signature = Sha256(sb.ToString());

        // 3. Construct JSON body
        var body = new {
            image = imageBase64,
            apiKey = API_KEY,
            appId = APP_ID,
            timestamp = long.Parse(timestamp),
            signature = signature
        };

        using var client = new HttpClient();
        var content = new StringContent(JsonSerializer.Serialize(body), Encoding.UTF8, "application/json");
        var response = await client.PostAsync($"{HOST}/grade/detection", content);

        Console.WriteLine($"Response: {await response.Content.ReadAsStringAsync()}");
    }

    static string Sha256(string str) {
        byte[] bytes = SHA256.HashData(Encoding.UTF8.GetBytes(str));
        return BitConverter.ToString(bytes).Replace("-", "").ToLower();
    }
}
- Laufzeitumgebung
- Unity 2020 LTS oder höher
- Scripting Backend: Mono oder IL2CPP sind beide möglich
- API Compatibility Level: .NET Standard 2.1 (empfohlen)
Step 1: Bilddatei vorbereiten
- Erstellen Sie das Verzeichnis im Unity-Projekt:
Assets/
└── StreamingAssets/
|    └── target.jpg
└── Scripts/
     └── GrageImage.cs
- Gemäß dem Namen des Assets-Verzeichnisses
- Erstellen Sie das Skript GrageImage.cs und kopieren Sie den Beispielcode unten
- Bereiten Sie ein Testbild für das image target vor
using System;
using System.IO;
using System.Text;
using UnityEngine;
using UnityEngine.Networking;
using System.Collections;

public class GrageImage : MonoBehaviour
{
    [Header("Config")]
    public string apiUrl = "https://Your-Server-end-URL" + "/grade/detection";
    public string authorizationToken = "YOUR API KEY AUTH TOKEN";
    public string imageFilePath = "target.jpg";   // StreamingAssets
    public string crsAppId = "<Your-CRS-AppId>";

    private void Start()
    {
        StartCoroutine(Grade());
    }

    private IEnumerator Grade()
    {
        // Read image file(Unity StreamingAssets)
        string fullPath = Path.Combine(Application.streamingAssetsPath, imageFilePath);

        if (!File.Exists(fullPath))
        {
            Debug.LogError($"Image file not found: {fullPath}");
            yield break;
        }

        byte[] imageBytes = File.ReadAllBytes(fullPath);
        string imageBase64 = Convert.ToBase64String(imageBytes);

        TargetRequestBody body = new TargetRequestBody
        {
            appId = crsAppId,
            image = imageBase64,
        };

        string json = JsonUtility.ToJson(body);

        // UnityWebRequest
        UnityWebRequest request = new UnityWebRequest(apiUrl, "POST");
        byte[] jsonBytes = Encoding.UTF8.GetBytes(json);

        request.uploadHandler = new UploadHandlerRaw(jsonBytes);
        request.downloadHandler = new DownloadHandlerBuffer();
        request.SetRequestHeader("Content-Type", "application/json");
        request.SetRequestHeader("Authorization", authorizationToken);

        yield return request.SendWebRequest();

        if (request.result == UnityWebRequest.Result.Success)
        {
            Debug.Log("Grade detail success:");
            Debug.Log(request.downloadHandler.text);
        }
        else
        {
            Debug.LogError("Grade detail failed:");
            Debug.LogError(request.error);
            Debug.LogError(request.downloadHandler.text);
        }
    }

    [Serializable]
    private class TargetRequestBody
    {
        public string appId;
        public string image;
    }
}
- Im Unity Editor:
- Erstellen Sie ein leeres GameObject
- Benennen Sie es GradeImage
- Ziehen Sie das Skript GrageImage auf dieses Objekt
Step 3: Parameter konfigurieren (Inspector)
Ändern Sie sie im Inspector-Panel gemäß den Daten in der Vorbereitungsliste.
- Api Url
- Authorization Token
- Image File Path: Standard target.jpg
- CRS AppId
Nur diese vier Elemente müssen geändert werden, damit es läuft. Tragen Sie die in der Checkliste vorbereiteten Parameter ein.
Step 4: Ausführen
- Klicken Sie auf Play
- Sehen Sie das Ergebnis in Console:
- Erfolg: gibt JSON zurück (result enthält ein Objekt)
- Fehler: HTTP / Fehlerinformationen