Use the Mega plugin to implement occlusion
Occlusion is a key technology for improving the immersive integration of virtual and real content in AR. This article guides you through implementing occlusion effects in the xr-frame environment through EasyAR cloud localization and annotations.
Before you start
- Be able to use Mega Studio in Unity.
- Be able to create and upload annotations with the Unity editor.
- Be able to create content aligned with the real world.
How occlusion is implemented
Offline modeling: use the Unity editor to create 1:1 matching geometry in the Block coordinate system for real-world entities such as walls, columns, and large equipment; or obtain an optimized model by cropping and reducing the faces of the Block dense model.
Runtime alignment: at xr-frame runtime, align the Block coordinate system with the real space through cloud localization and load the corresponding geometry.
Material replacement: assign special occlusion materials to these geometries.
Visual effect: when the GPU renders other virtual objects, pixels in occluded parts are automatically culled because they fail the depth test, making virtual objects follow the occlusion logic of the real physical space.
How to arrange occlusion with simple geometry
Place box annotations accurately by comparing against the dense model and panorama. After placement, the annotation looks like a "wall" or "column".
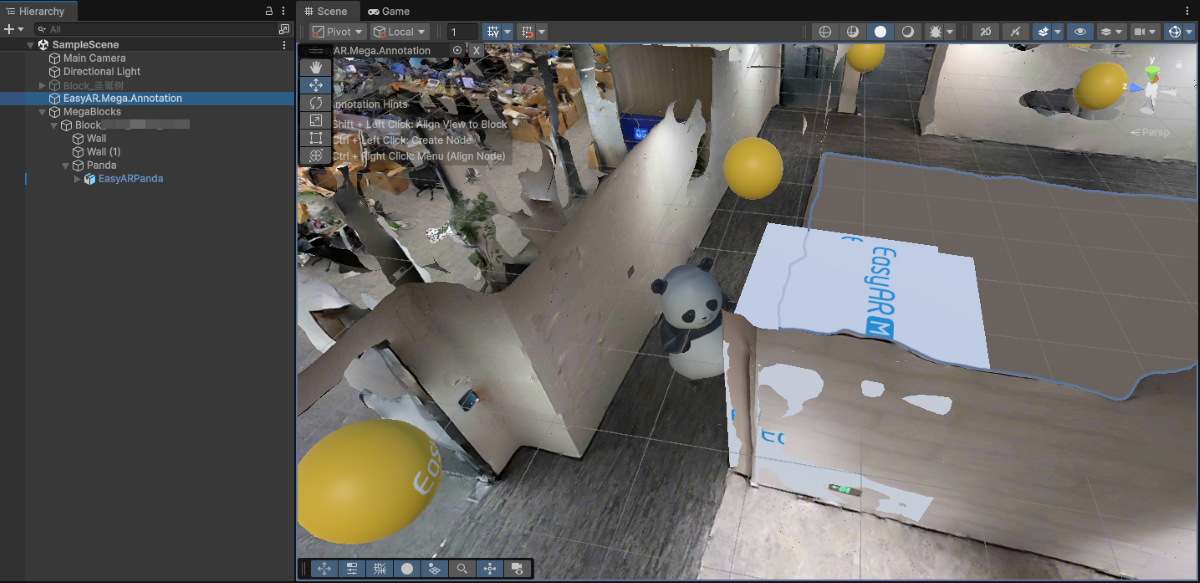
Modify the annotation name, such as
occlusion_wall, record the ID, and upload the annotation.In the xr-frame Mini Program, use its built-in geometry to load the annotation used as occlusion.
In the EMA loading callback, use
scene.createElement(xrFrameSystem.XRMesh,{})to create simple geometry and assign theeasyar-occlusionmaterial.Note
The loading, registration, deregistration, and unloading of the
easyar-occlusionmaterial are controlled by AR Session.
```ts
handleEmaResult(ema: easyar.ema.v0_5.Ema) {
    let blockHolder: easyar.BlockHolder = session.blockHolder;
    ema.blocks.forEach(emaBlock => {
        const blockInfo: easyar.BlockInfo = {
            id: emaBlock.id
        };
        // 若 Block 节点不存在,创建 Block 节点
        blockHolder.holdBlock(blockInfo, easyarPlugin.toXRFrame(emaBlock.transform));
    });
    ema.annotations.forEach(annotation => {
        if (annotation.type != mega.EmaV05AnnotationType.Node) {
            return;
        }
        const nodeAnnotation = annotation as easyar.ema.v0_5.Node;
        const xrNode: xrfs.XRNode = easyarPlugin.createXRNodeFromNodeAnnotation(nodeAnnotation, blockHolder);
        const emaName: string = nodeAnnotation.name;
        const geometryStr: string = nodeAnnotation.geometry === "cube" ? "cube" : "sphere";
        const assetInfo = AnnotationMetaData[nodeAnnotation.id as keyof typeof AnnotationMetaData];
        let model: xrfs.Element;

        if (assetInfo) {
            // GLTF部分
        } else {
            model = scene.createElement(
                xrFrameSystem.XRMesh,
                {
                    // 使用插件注册好的遮挡材质
                    material: "easyar-occlusion",
                    // 使用 xr-frame 内置几何体,此处也可以直接使用 "cube"
                    geometry: geometryStr,
                    name: emaName,
                    "receive-shadow": "false",
                    "cast-shadow": "false"
                    // 注意不要修改 Scale
                }
            );
            xrNode.addChild(model);
        }
    })
}
```
With occlusion, this panda can dance behind the wall.
How to arrange occlusion with complex geometry
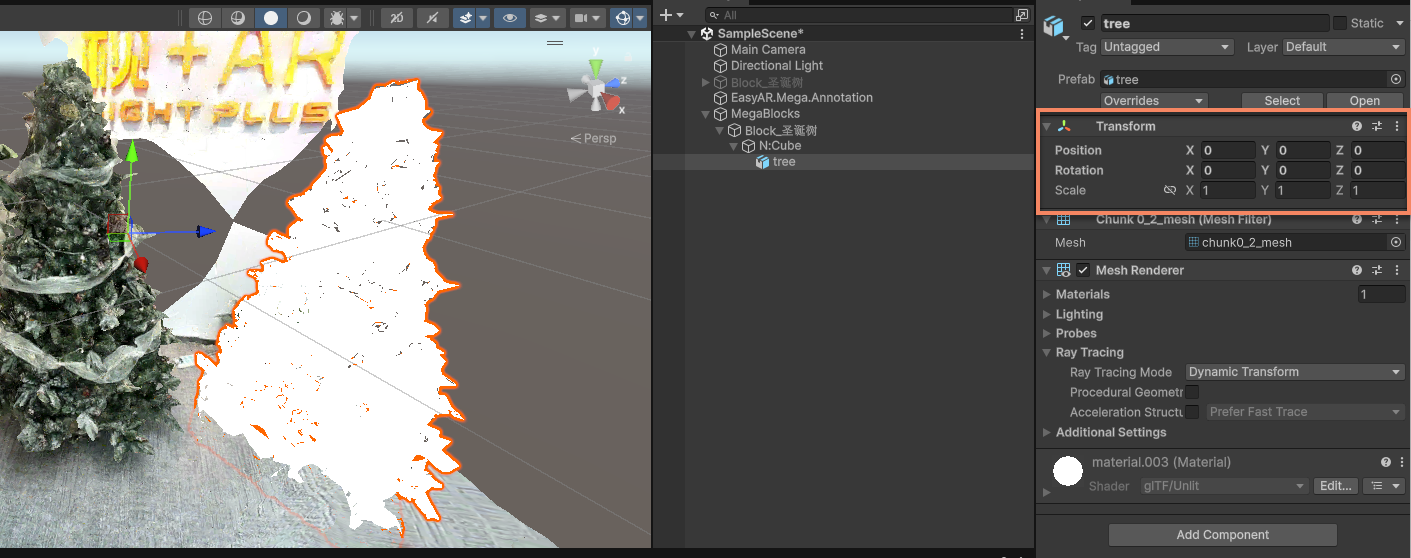
This applies to scenarios that require high-precision occlusion, such as irregular devices and irregular buildings. You can use the mask file from mapping results, or export the Block dense model through Mega Studio in Unity, then crop and reduce it to obtain a white model for occlusion.
Use the mask file from mapping results
Download the glb mask file from the mapping result through the Mask file download entry of the cloud localization database and crop it. The cropped model does not need to be rotated around the Y axis when loaded in xr-frame.
Note
This download method applies only to mapping results from mapping version 9.6 or later.
After adding the Block to the cloud localization database, record the corresponding Block ID, and click Mask file download in the Action column of the row where the Block is located.
In the popup, select Low precision, and click the corresponding Download button to download the mask file in
glbformat.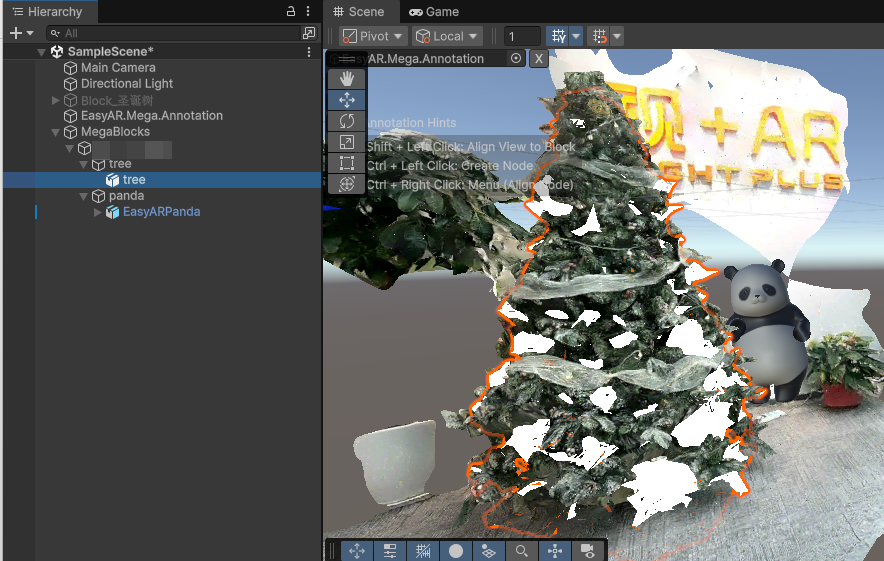
Open the downloaded model in digital content creation software, such as Blender.

Crop the model, keep only the part needed for occlusion, and save it in
glbformat. During processing, keep the original position, rotation, scale, and coordinate system of the model unchanged so that it aligns with the corresponding Block at runtime.
Prepare the cropped
glbfile. You can upload the file to an HTTPS hosting server accessible by the Mini Program and obtain the URL, or put the file in theminiprogram/assets/directory of the Mini Program project and use a relative path directly. When using a hosting server, configure the corresponding legal download domain in the Mini Program backend and add the domain to the Mini Program whitelist.Fill in the model address in the component resource configuration
sampleAssets.occlusionMesh.src. If the model is placed in theassets/directory, use a relative path, for example:src: "assets/occlusion_mesh_sd.glb",You can also fill in an HTTPS URL from the hosting server, such as
https://your-domain.example/occlusion.glb.The component should implement model loading, mounting, occlusion material assignment, and resource release logic. Mount the model under the successfully localized Block node and keep the model's original position, rotation, and scale.
After the model is loaded and localization succeeds, create an
XRNodeunder the first Block node, then mount theXRGLTFmodel:showOcclusionMesh() { if (!scene) { console.error("Empty scene"); return; } const blockHolder = session?.blockHolder; if (!blockHolder) { console.warn("Session not initialized"); return; } if (occlusionMeshNode) { return; } const root = blockHolder.blocks[0]?.el; if (!root) { console.warn("Localization must succeed before showing the occlusion mesh"); return; } if (!scene.assets.getAsset("gltf", sampleAssets.occlusionMesh.assetId)) { console.warn("Occlusion mesh asset is not loaded"); return; } const node = scene.createElement(xrFrameSystem.XRNode); root.addChild(node); const model = scene.createElement(xrFrameSystem.XRGLTF, { model: sampleAssets.occlusionMesh.assetId }); node.addChild(model); node.getComponent(xrFrameSystem.Transform).visible = this.data.occlusionMeshVisible; occlusionMeshNode = node; },After localization succeeds, mount the model under the Block node. No manual spatial position setting is needed.
This method directly displays the downloaded original white model and keeps the model's default position, rotation, scale, and visible material. For resource loading and node mounting, see How to load 3D content in an AR scene at xr-frame runtime.
Run the Mini Program in the real-world scene corresponding to the Block. After localization succeeds, display the mask file and check whether the model fits the real scene and whether virtual objects are occluded by the retained cropped area.
Use the dense model exported from Unity
Export the Block dense model through Mega Studio in Unity, then crop and reduce it to obtain a white model for occlusion.
In the Unity scene, click the Mega Block node and record the BlockID in the Inspector panel.
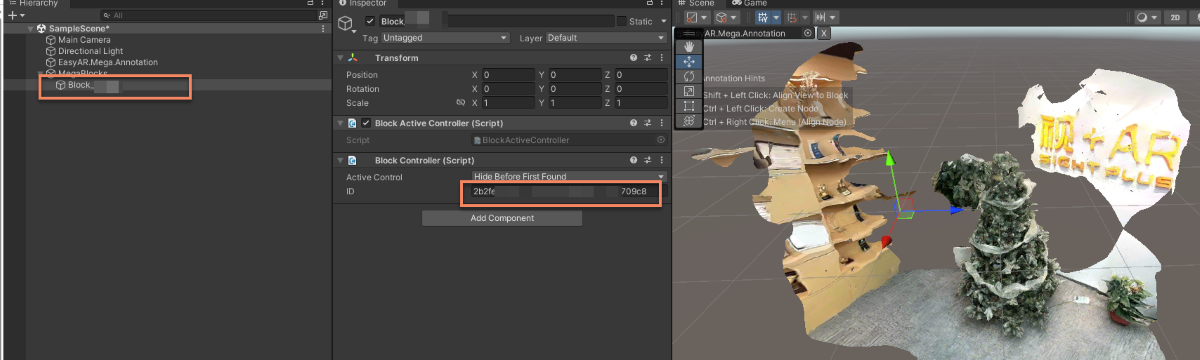
Select export in Block of Mega Studio.
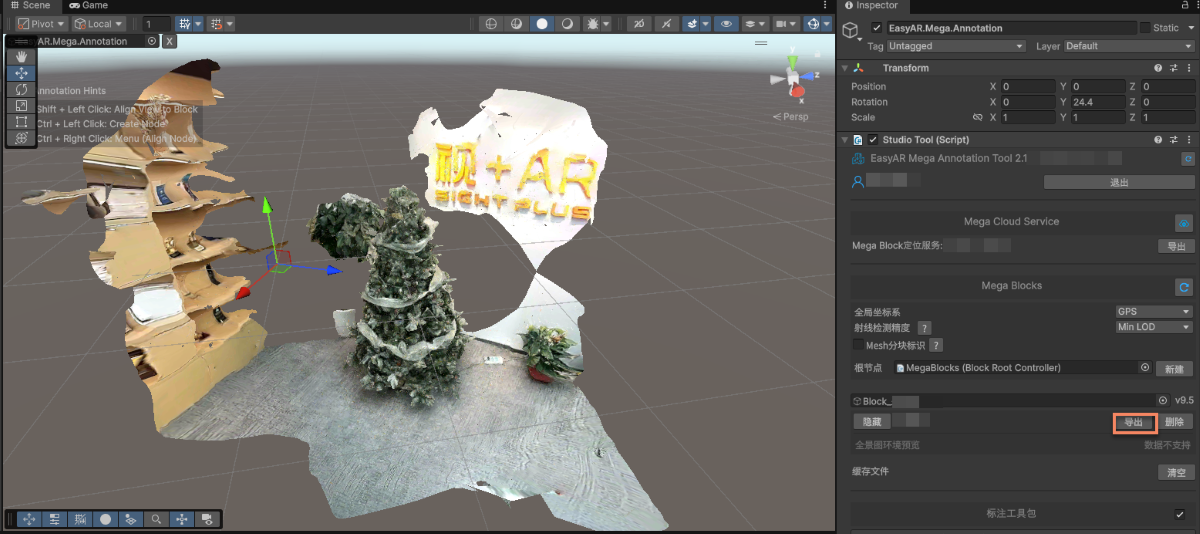
Modify the export options and export.
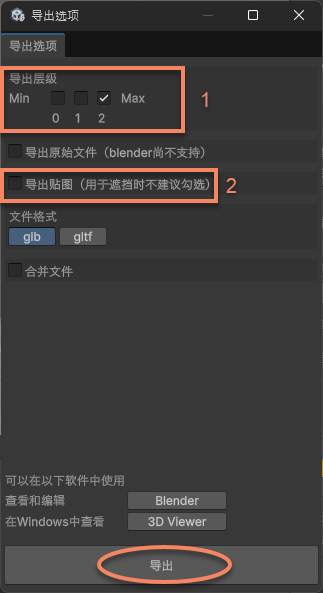
In the figure, 1 is the LOD level. The lower the level, the simpler the model and the fewer faces. Select 2 if you need the highest precision, or select 1 or 0 if you can accept reduced precision to reduce the face count.
In the figure, 2 is the texture export option. Because only the white model is needed as occlusion, textures are not needed.
Crop and reduce the exported model in digital content creation software, such as Blender, and save it as
Glb.Tip
The example uses Blender's Decimate Modifier
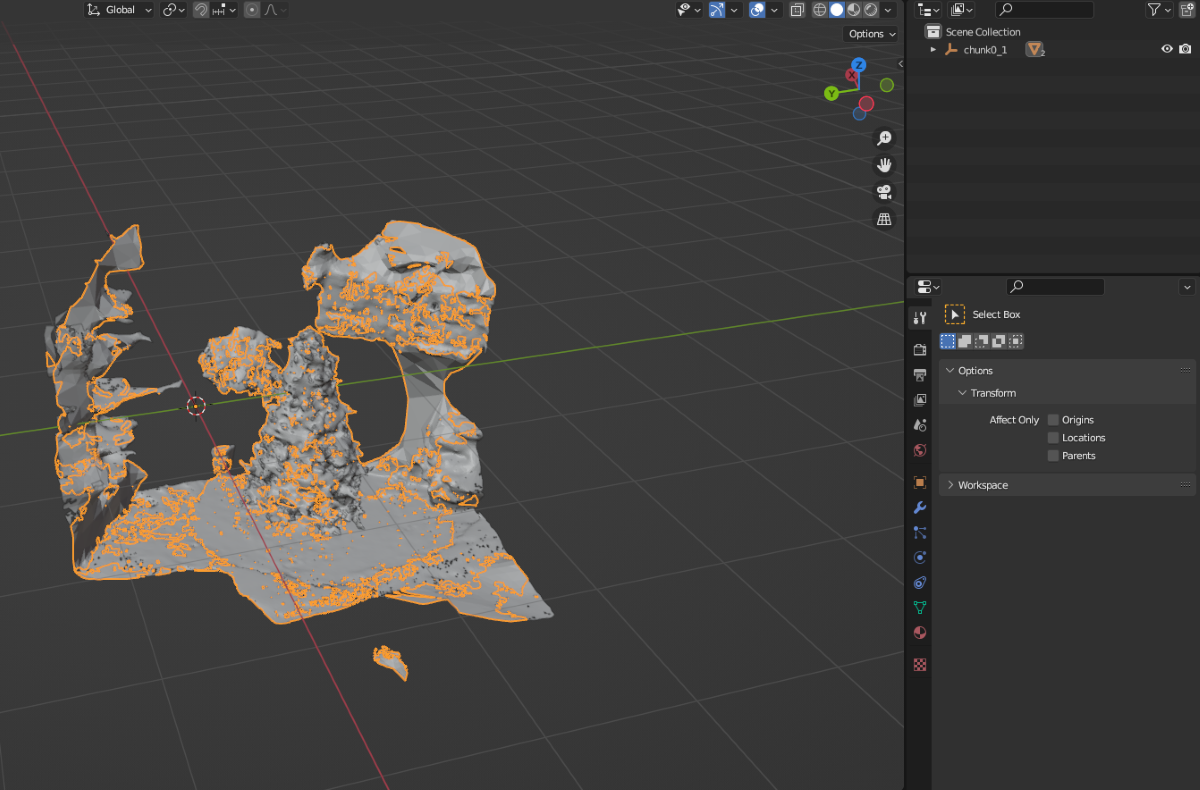
After cropping and reduction:
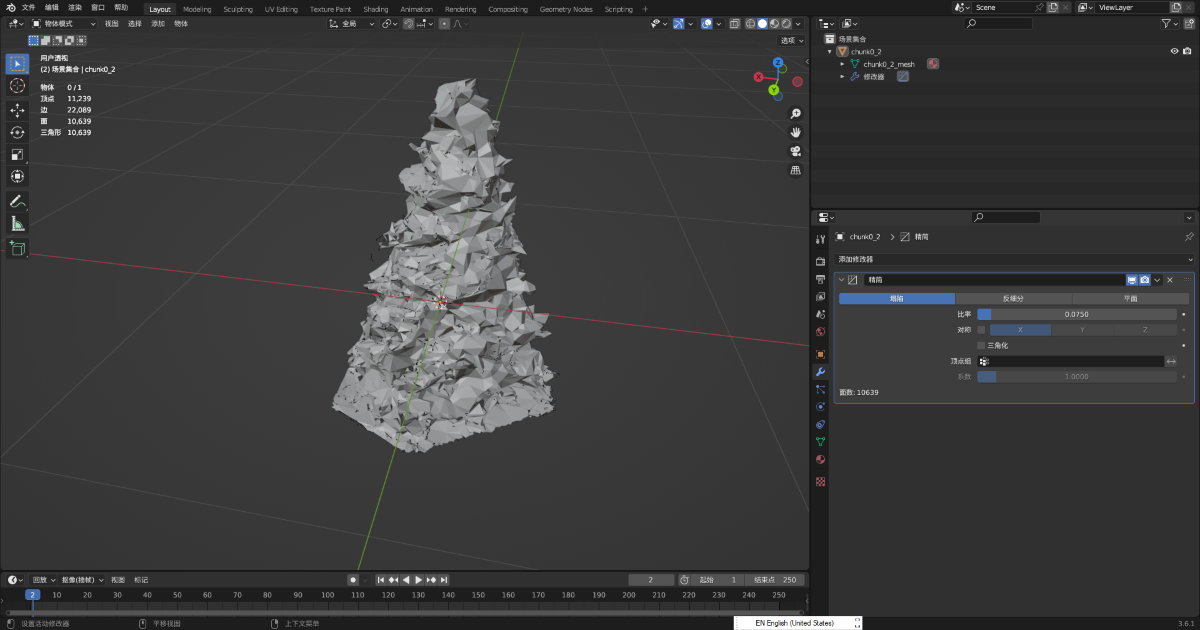
Put the
Glbfile used for occlusion in theminiprogram/assets/directory of the Mini Program project and use a relative path, or mount it on an accessible HTTPS file server and use its URL. When using a server URL, configure the corresponding legal download domain in the Mini Program backend and add the domain to the Mini Program whitelist.Load the GLTF used as occlusion in the xr-frame Mini Program.
First load the GLTF model used for occlusion, then use
scene.createElement(xrFrameSystem.XRGLTF,options)to create the GLTF model.Use
assets.getAsset("material", "easyar-occlusion")to get the material object.Use
model.getComponent(xrFrameSystem.GLTF).meshes.forEach((m: any) => {m.setData({ neverCull: true, material: occlusionMaterial });}to modify the material of the GLTF model.Note
The loading, registration, deregistration, and unloading of the
easyar-occlusionmaterial are controlled by AR Session.
```ts
const sampleAssets = {
    occlusion1: {
        assetId: "occlusion1",
        type: "gltf",
        src: "url/occlusion1.glb",
        options: {}
    }
}
async loadAsset() {
    if (!scene) {console.error("Empty scene"); return;}
    try {
        await scene.assets.loadAsset(sampleAssets.occlusion1);
    } catch (err) {
        console.error(`Failed to load assets: ${err.message}`);
    }
},
addOcclusion() {
    model = scene.createElement(
        xrFrameSystem.XRGLTF,
        {
            "model": assetInfo.assetId,
            "anim-autoplay": assetInfo.animation ? assetInfo.animation : "",
            "scale": assetInfo.scale ? assetInfo.scale : "1 1 1",
            name: "tree"
        }
    );
    const blockID = "aaaa1234-bbbb-cccc-dddd-eeeeee123456" //Fill in the Block ID here
    if (!blockHolder.getBlockById(blockParent.id)) {
        // If no Block node exists, create one
        blockHolder.holdBlock({
            id: blockID
        })
    }
    // Get the Block node in the xr-frame scene
    let blockElement = blockHolder.getBlockById(blockParent.id).el;
    // Attach the clipped occlusion model under the Block node as its child node
    blockElement.addChild(model);
    /**
     * Because GLTF loaders behave differently, to keep the model orientation in xr-frame exactly consistent with the Unity rendering result
    * Sometimes the loaded model needs to be rotated 180 degrees around the Y axis in place
    */
    let modelTransform = model.getComponent(xrFrameSystem.Transform);
    let currentRotation = modelTransform.quaternion.clone();
    let targetRotation = currentRotation.multiply(new xrFrameSystem.Quaternion().setValue(0, 1, 0, 0));
    modelTransform.quaternion.set(targetRotation);
    //Note: the material must be changed after modifying Transform
    if (assetInfo.assetId == 'occlusion1') {
        //Get the occlusion material provided by the Mega plugin
        let occlusionMaterial = scene.assets.getAsset("material", "easyar-occlusion");
        //Modify the occlusion material
        model.getComponent(xrFrameSystem.GLTF).meshes.forEach((m: any) => {
            m.setData({ neverCull: true, material: occlusionMaterial });
        });
    }
}
```
Note
Here, using the Mega Block dense model after cropping as occlusion does not require annotation synchronization for spatial position. This is because in digital content creation software, such as Blender, the model can be reduced and cropped without changing the coordinate system definition.
If you need to precisely place your own GLTF model as occlusion, see How to place an occlusion model aligned with space.
The final real-device running effect is shown in the video at the top of this article.
Expected occlusion effect
The occlusion effect in an xr-frame Mini Program is mainly affected by the following:
- The accuracy of localization tracking itself
- The accuracy of model placement
- The accuracy of the model itself, if it is not simple geometry
It is normal for several centimeters of misalignment to occur during localization drift.
Too many faces in the occlusion model can easily affect performance. It is recommended to use it only in necessary areas and use simple geometry as occlusion as much as possible.