Collect VST headset screenshots and screen recording data
When AR visual effects are abnormal on a VST device, keep screenshots and screen recording files of the abnormal behavior in time and send them to the EasyAR technical support team.
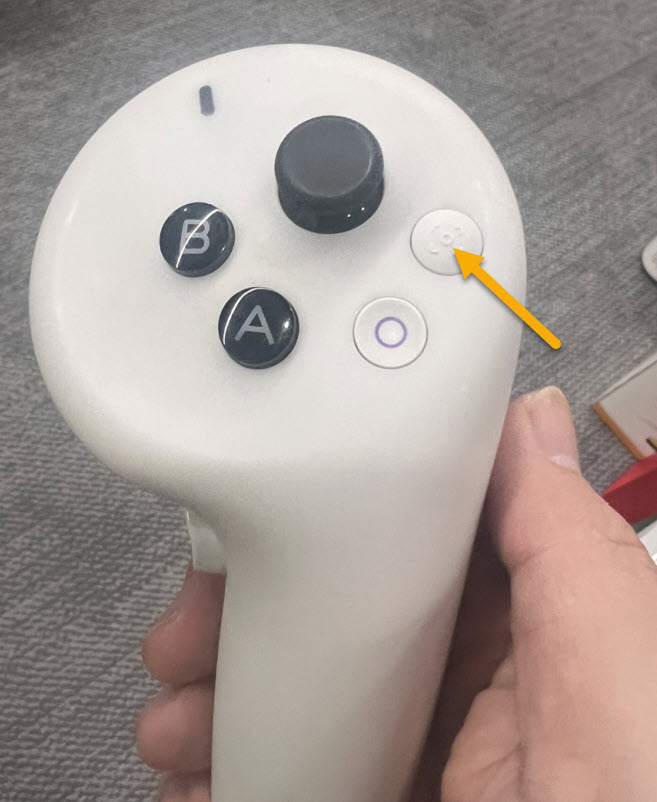
Click the button shown in the figure on the right controller to take a screenshot.
Button combination: press the Digital Crown and the top button on the top of the headset at the same time, then release them quickly. You will hear the familiar shutter sound, and the screenshot will be saved automatically in the Photos App.
Voice control: say directly to Siri: "Siri, take a screenshot".
Note
Because Vision Pro uses foveated rendering, the area you are looking at is the clearest in screenshots, while the edges may be slightly blurred. Before pressing the buttons, it is recommended to look directly at the key content you want to capture.
Long press the specified button shown in the figure on the right controller to start screen recording.
Long press the specified button shown in the figure on the right controller again to stop screen recording.
Note
After screen recording is enabled, a small red dot indicator appears in the upper-right corner of the Pico device screen.
After screen recording is stopped, the small red dot indicator in the upper-right corner of the Pico device screen disappears.
Screen recording needs to be enabled through Control Center:
Open Control Center: look upward until you see a small white dot at the top of the screen, which is a downward arrow icon, then look at it and pinch your fingers to open it.
Select recording: tap the Controls icon in Control Center, which looks like two horizontal sliders, then find and tap the circular recording button, a solid dot.
Note
Note: if you do not see the recording button, go to Settings > Control Center and add "Record My View".
Enable microphone (optional): if you want to record your own voice during screen recording, long press the recording button, and options will pop up for enabling the microphone.
Stop recording: open Control Center again and tap the recording button, or tap the red status bar/time indicator that appears above your view.
Enter the device file path: Internal shared storage\Pictures\Screenshots
Select the corresponding data file to export
Note
The first part of the storage path for screenshots and videos varies by device model, but the latter part of the path is exactly the same.
Most recommended: through Photos App + iCloud (automatic sync)
This is the most seamless operation.
Operation: make sure your Vision Pro is signed in with an Apple ID and that iCloud Photos is enabled in Settings > Photos.
Sync: the images and videos you capture on Vision Pro will be uploaded automatically.
Get: after a few minutes, depending on the video size, you can directly view and download these materials in the Photos App on your iPhone, iPad, or Mac.
AirDrop
If you only need to export a few specific screenshots, or want to quickly send them to nearby devices, AirDrop is preferred.
Open the Photos App in Vision Pro.
Find the image or video you want to export, and tap the Share button, the square icon with an arrow.
Tap AirDrop, then choose your Mac or iPhone.
AirPlay
If you want to export large files, you can use the following method:
Enable "AirPlay Receiver" on Mac (Settings > General > AirDrop & Handoff).
Use the sharing function on Vision Pro to send directly to the specified folder on Mac.
File feedback
Send the collected screenshots and screen recording files to the EasyAR technical support team.