圖像識別難度評級
在將圖像正式添加到雲識別(CRS)圖庫之前,最佳實踐是預先對其進行質量評估。
如果目標圖的可識別區域過少(如白牆、純色色塊)或紋理過於簡單,其識別成功率將大幅降低。本章將詳細介紹 CRS 的評級機制,幫助您篩選高質量的 AR 識別素材。
評級機制與分數含義
| 分值 | 評價 | 建議 |
|---|---|---|
| 0-1 | 優秀 | 紋理極其豐富,識別速度快,跟蹤非常穩定。 |
| 2 | 良好 | 具備足夠的特徵點,能夠正常進行 AR 業務。 |
| 3 | 一般 | 識別率可能受光照或角度影響,建議優化紋理。 |
| 4 | 較差 | 極難識別,不建議作為生產環境的識別圖。 |
| -1 | 錯誤 | 圖片格式不支持或文件損壞。 |
重要事項
實際測試原則:如果圖庫內目標總數較少,即使評級分稍高,在特定環境下可能依然可用。建議以實際真機測試效果為準。
核心綜合指標
我們主要關注以下兩個綜合指標,這兩個指標有單獨的 API 接口,給出綜合評級:
識別難度綜合級別 (detectableRate):
- 最核心指標。決定了雲端“以圖搜圖”的成功率。
/grade/detectionAPI 接口給出的綜合評級
跟蹤難度綜合級別 (trackableRate):
- 如果您在 Unity/App 端使用 EasyAR Sense SDK 進行本地跟蹤,該指標決定了 AR 內容疊加的穩定性。
/grade/trackingAPI 接口給出的綜合評級
其它細節指標
- detectableDistinctiveness
- detectableFeatureCount
- trackableDistinctiveness
- trackableFeatureCount
- trackableFeatureDistribution
- trackablePatchContrast
- trackablePatchAmbiguity
這些指標從圖像算法維度來評級,每個指標依然是依據難度從 0 到 4 給出。
如何瀏覽評級結果
數據庫的每張目標圖的詳情裡都有目標圖的詳細評級。可通過 API 獲取目標圖屬性查看。也可以通過 EasyAR 雲識別管理查看。
通過 EasyAR Web 查看
- 登錄 EasyAR Web 進入開發中心
- 雲識別管理
- 選擇開通的圖庫
- 點擊
管理進入圖庫管理 - 選中目標圖
- 點
管理查看目標是圖的詳情。
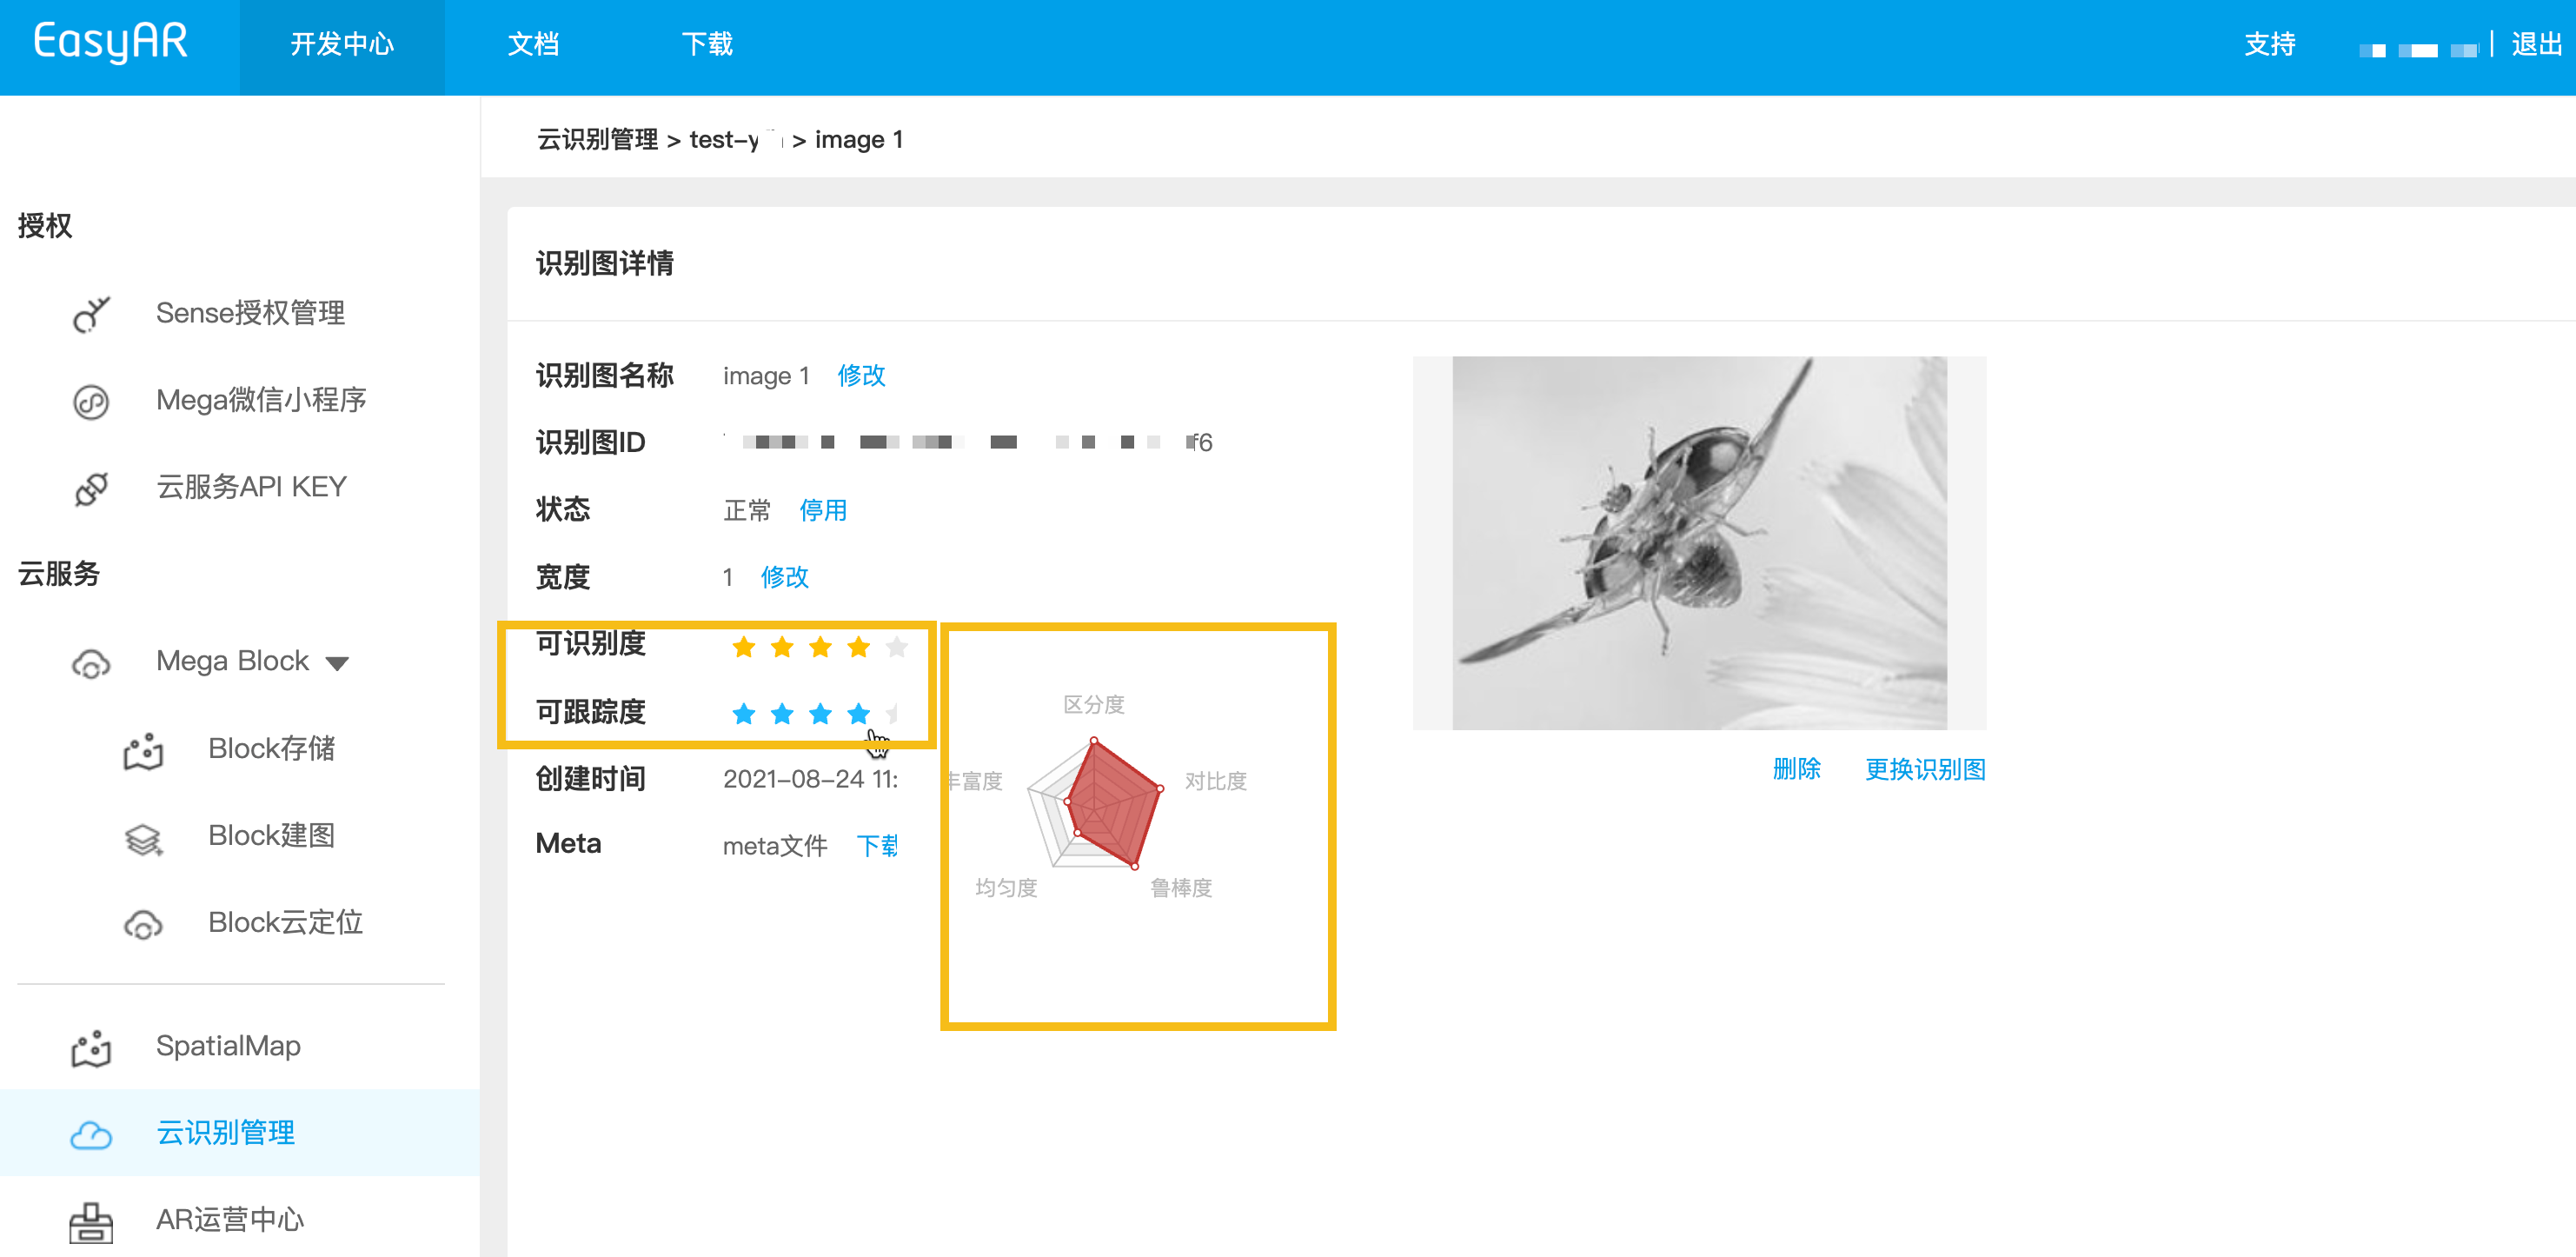
如圖所示,詳情頁中有兩項核心綜合指標,以及五邊形展示了五個細節指標。
- 可識別度:依據原識別難度綜合分數 (detectableRate) 對應成可識別度五星級別。原難度分越小,星星越多,越容易識別
- 可跟蹤度:依據原跟蹤難度綜合分數 (trackableRate) 對應成可跟蹤度五星級別。原難度分越小,星星越多,越容易識別
API 獲取評級結果 —— 目標圖列表接口
通過 目標圖列表接口 或獲取詳情,可以得到每個目標圖包含 detectableRate 在內的所有詳細算法指標(如紋理分佈、特徵點數量等)。
最佳實踐:API 預先評級
在構建自動化上傳後台時,建議在正式上傳前調用評級接口。
參考文檔:圖片識別難度評級 API 接口
評級接口分類
- 識別評級 (
/grade/detection):僅返回識別難度。(最常用) - 跟蹤評級 (
/grade/tracking):僅返回跟蹤難度。 - 詳細評級 (
/grade/detail):返回多維度指標,供專業算法人員參考。
調用準備
準備清單如下,如何準備請參考調用準備清單
- CRS AppId
- 鑑權憑證: API Key / API Secret 或者 Token
- Server-end URL: 目標圖像管理 URL 地址,https 使用 443 端口
- 測試圖片: JPEG/PNG 格式,大小不得超過 2 MB
- 先將本機目標圖片轉為 Base64(macOS/Linux),結果存入 image_base64.txt
base64 -i ./target.jpg | tr -d '\n' > image_base64.txt
- 請替換佔位符為實際參數,並執行 curl 指令稿
- Your-Server-side-URL → 實際 API Host
- Your-Token → 實際的 API Key Authorization Token
- Your-CRS-AppId → 您的 appId
curl -X POST "https://<Your-Server-side-URL>/grade/detail" \
  -H "Content-Type: application/json" \
  -H "Authorization: <YOUR-TOKEN>" \
  -d '{
    "appId": "<Your-CRS-AppId>",
    "image": "'"$(cat image_base64.txt)"'"
  }'
下載 Java 範例程式碼
透過 Maven 方式導入專案
Step 1. 開啟相關程式碼檔案 Grade.java
Step 2. 修改全域變數,替換你準備清單裡的認證參數
- CRS AppId
- API Key / API Secret
- Server-end URL
- IMAGE_PATH : 待上傳目標圖檔
import okhttp3.*;
import org.json.JSONObject;
import java.io.IOException;
import java.nio.file.Files;
import java.nio.file.Path;
import java.nio.file.Paths;
import java.util.Base64;
import java.util.HashMap;
import java.util.Map;

public class Grade {
    private static final String TARGET_MGMT_URL = "http://cn1.crs.easyar.com:8888";
    private static final String CRS_APPID       = "--here is your CRS AppId--";
    private static final String API_KEY         = "--here is your API Key--";
    private static final String API_SECRET      = "--here is your API Secret--";
    private static final String IMAGE_PATH      = "test_target_image.jpg";

    enum GradeType {
        DETAIL,
        DETECTION,
        TRACKING
    }
    private static final Map<GradeType, String> GRADE_URL = new HashMap<GradeType, String>(){
        {
            put(GradeType.DETAIL,    "/grade/detail") ;
            put(GradeType.DETECTION, "/grade/detection") ;
            put(GradeType.TRACKING, "/grade/tracking") ;
        }
    };

    public String grade(Auth auth, String imgPath, GradeType gradeType) throws IOException {
        final Path mImagePath   = Paths.get(imgPath);
        JSONObject params = new JSONObject().put("image", Base64.getEncoder().encodeToString(
                Files.readAllBytes(mImagePath)
        ));
        Auth.signParam(params, auth.getAppId(), auth.getApiKey(), auth.getApiSecret());
        RequestBody requestBody = FormBody.create(MediaType.parse("application/json; charset=utf-8")
                , params.toString());
        Request request = new Request.Builder()
                .url(auth.getCloudURL() + GRADE_URL.get(gradeType))
                .post(requestBody)
                .build();
        return new OkHttpClient.Builder().build().newCall(request).execute().body().string();
    }

    public static void main(String[] args) throws IOException {
        Auth accessInfo  =  new Auth(CRS_APPID, API_KEY, API_SECRET, TARGET_MGMT_URL);

        System.out.println("================== grade details ==================");
        System.out.println(new Grade().grade(accessInfo, IMAGE_PATH, GradeType.DETAIL));

        System.out.println("================== grade for detection ==================");
        JSONObject gradeResp = new JSONObject(new Grade().grade(accessInfo, IMAGE_PATH, GradeType.DETECTION));
        System.out.println("Detection grade: " + gradeResp.getJSONObject(Common.KEY_RESULT).get(Common.KEY_GRADE));

        System.out.println("================== grade for tracking =================== ");
        gradeResp = new JSONObject(new Grade().grade(accessInfo, IMAGE_PATH, GradeType.TRACKING));
        System.out.println("Tracking grade: " + gradeResp.getJSONObject(Common.KEY_RESULT).get(Common.KEY_GRADE));
    }
}
Step 3. 執行 Main
下載 NodeJS 範例程式碼
Step 1. 配置密鑰文件 keys.json
- CRS AppId
- API Key / API Secret
{
  "appId": "--here is your appId for CRS App Instance for SDK 4--",
  "apiKey": "--here is your api key which is create from website and which has crs permission--",
  "apiSecret": "--here is your api secret which is create from website--"
}
Step 2. 運行,指定測試圖片、密鑰文件以及 Server-end URL
node bin/grade test.jpeg -t <Server-end-URL> -c keys.json
var argv = require('yargs')
    .usage('Usage: $0 [image] -t [host] -c [keys]')
    .demand(1)
    .default('t', 'http://localhost:8888').alias('t', 'host')
    .default('c', 'keys.json').alias('c', 'keys')
    .help('h').alias('h', 'help')
    .epilog('copyright 2015, sightp.com')
    .argv;

var fs = require('fs');

var imageFn = argv._[0];
var host = argv.host;
var keys = JSON.parse(fs.readFileSync(argv.keys));

var farmer = require('../farmer')(host, keys);

farmer.getTrackingGrade({
    'image': fs.readFileSync(imageFn).toString('base64')
})
.then(function(resp) {
    console.log(resp);
})
.fail(function(err) {
    console.log(err);
});
下載 Php 範例代碼
Step 1. 打開入口代碼 demo.php
Step 2. 修改全域變數,替換你準備清單裡的認證參數
- CRS AppId
- API Key / API Secret
- Server-end URL
- imageFilePath : 待上傳目標圖文件路徑
<?php
include 'EasyARClientSdkCRS.php';
$apiKey = 'API Key';
$apiSecret = 'API Secret';
$crsAppId = 'CRS AppId'
$crsCloudUrl = 'https://cn1-crs.easyar.com';
$imageFilePath = '1.jpg'

$sdk = new EasyARClientSdkCRS($apiKey, $apiSecret, $crsAppId, $crsCloudUrl);

$image = base64_encode(file_get_contents($imageFilePath));
$rs = $sdk->detection($image);
if ($rs->statusCode == 0) {
  print_r($rs->result->grade);
} else {
  print_r($rs);
}
Step 3. 運行 php demo.php
新建相關程式碼檔案 grade.py,修改全域變數,然後執行
pip install requests
python grade.py
import time
import hashlib
import requests
import base64

# --- Global Configuration ---
API_KEY = "YOUR_API_KEY"
API_SECRET = "YOUR_API_SECRET"
APP_ID = "YOUR_APP_ID"
HOST = "https://crs-cn1.easyar.com"
IMAGE_PATH = "test.jpg"

def main():
    # 1. 讀取並編碼影像
    with open(IMAGE_PATH, "rb") as f:
        image_base64 = base64.b64encode(f.read()).decode('utf-8')

    timestamp = str(int(time.time() * 1000))

    # 2. 建構參數字典型別 (包含影像)
    params = {
        'apiKey': API_KEY,
        'appId': APP_ID,
        'timestamp': timestamp,
        'image': image_base64
    }

    # 3. 依鍵排序並串接
    sorted_keys = sorted(params.keys())
    builder = "".join([f"{k}{params[k]}" for k in sorted_keys])
    builder += API_SECRET

    # 4. 產生 SHA256 簽章
    signature = hashlib.sha256(builder.encode('utf-8')).hexdigest()

    # 5. 傳送 POST 請求
    payload = {**params, "signature": signature, "timestamp": int(timestamp)}
    response = requests.post(f"{HOST}/grade/detection", json=payload)

    print(f"狀態: {response.status_code}")
    print(f"回應: {response.text}")

if __name__ == "__main__":
    main()
新建相關代碼文件 main.go,修改全域變數,然後運行
go run main.go
main.go:
package main

import (
  "bytes"
  "crypto/sha256"
  "encoding/base64"
  "encoding/json"
  "fmt"
  "io"
  "net/http"
  "os"
  "sort"
  "strconv"
  "time"
)

var (
  ApiKey    = "YOUR_API_KEY"
  ApiSecret = "YOUR_API_SECRET"
  AppId     = "YOUR_APP_ID"
  Host      = "https://crs-cn1.easyar.com"
  ImagePath = "test.jpg"
)

func main() {
  fileData, _ := os.ReadFile(ImagePath)
  imgBase64 := base64.StdEncoding.EncodeToString(fileData)

  tsInt := time.Now().UnixNano() / 1e6
  tsStr := strconv.FormatInt(tsInt, 10)

  params := map[string]string{
    "apiKey":    ApiKey,
    "appId":     AppId,
    "timestamp": tsStr,
    "image":     imgBase64,
  }

  keys := make([]string, 0, len(params))
  for k := range params { keys = append(keys, k) }
  sort.Strings(keys)

  var builder bytes.Buffer
  for _, k := range keys {
    builder.WriteString(k)
    builder.WriteString(params[k])
  }
  builder.WriteString(ApiSecret)

  signature := fmt.Sprintf("%x", sha256.Sum256(builder.Bytes()))

  payload := map[string]interface{}{
    "image":     imgBase64,
    "apiKey":    ApiKey,
    "appId":     AppId,
    "timestamp": tsInt,
    "signature": signature,
  }
  jsonBytes, _ := json.Marshal(payload)

  resp, _ := http.Post(Host+"/grade/detection", "application/json", bytes.NewBuffer(jsonBytes))
  defer resp.Body.Close()
  body, _ := io.ReadAll(resp.Body)
  fmt.Printf("Response: %s\n", string(body))
}
在 Cargo.toml 中添加 reqwest, tokio, sha2, hex 依賴。
執行 cargo run。
use sha2::{Sha256, Digest};
use std::collections::BTreeMap;
use std::time::{SystemTime, UNIX_EPOCH};
use base64::{Engine as _, engine::general_purpose};
const API_KEY: &str = "YOUR_API_KEY";
const API_SECRET: &str = "YOUR_API_SECRET";
const APP_ID: &str = "YOUR_APP_ID";
const HOST: &str = "https://crs-cn1.easyar.com";
const IMAGE_PATH: &str = "test.jpg";
#[tokio::main]
async fn main() -> Result<(), Box<dyn std::error::Error>> {
let img_bytes = std::fs::read(IMAGE_PATH)?;
let img_b64 = general_purpose::STANDARD.encode(img_bytes);
let ts_raw = SystemTime::now().duration_since(UNIX_EPOCH)?.as_millis();
let ts_str = ts_raw.to_string();
// 1. Collect params in BTreeMap for automatic sorting
let mut params = BTreeMap::new();
params.insert("apiKey", API_KEY);
params.insert("appId", APP_ID);
params.insert("timestamp", &ts_str);
params.insert("image", &img_b64);
// 2. Build sign string
let mut builder = String::new();
for (k, v) in ¶ms {
builder.push_str(k);
builder.push_str(v);
}
builder.push_str(API_SECRET);
// 3. Hash
let mut hasher = Sha256::new();
hasher.update(builder.as_bytes());
let signature = hex::encode(hasher.finalize());
let mut body = serde_json::Map::new();
body.insert("image".into(), img_b64.into());
body.insert("apiKey".into(), API_KEY.into());
body.insert("appId".into(), APP_ID.into());
body.insert("timestamp".into(), ts_raw.into());
body.insert("signature".into(), signature.into());
let client = reqwest::Client::new();
let res = client.post(format!("{}/grade/detection", HOST))
.json(&body)
.send()
.await?;
println!("Response: {}", res.text().await?);
Ok(())
}
建立 .NET 控制台專案。
dotnet new console
dotnet run
using System;
using System.Collections.Generic;
using System.IO;
using System.Linq;
using System.Security.Cryptography;
using System.Text;
using System.Net.Http;
using System.Text.Json;

class Program {
    static string API_KEY = "YOUR_API_KEY";
    static string API_SECRET = "YOUR_API_SECRET";
    static string APP_ID = "YOUR_APP_ID";
    static string HOST = "https://crs-cn1.easyar.com";
    static string IMAGE_PATH = "test.jpg";

    static async System.Threading.Tasks.Task Main() {
        string timestamp = DateTimeOffset.Now.ToUnixTimeMilliseconds().ToString();
        string imageBase64 = Convert.ToBase64String(File.ReadAllBytes(IMAGE_PATH));

        // 1. 準備簽章資料
        var data = new SortedDictionary<string, string> {
            { "apiKey", API_KEY },
            { "appId", APP_ID },
            { "timestamp", timestamp },
            { "image", imageBase64 }
        };

        // 2. 串接鍵值
        StringBuilder sb = new StringBuilder();
        foreach (var pair in data) sb.Append(pair.Key).Append(pair.Value);
        sb.Append(API_SECRET);

        string signature = Sha256(sb.ToString());

        // 3. 建構 JSON 請求體
        var body = new {
            image = imageBase64,
            apiKey = API_KEY,
            appId = APP_ID,
            timestamp = long.Parse(timestamp),
            signature = signature
        };

        using var client = new HttpClient();
        var content = new StringContent(JsonSerializer.Serialize(body), Encoding.UTF8, "application/json");
        var response = await client.PostAsync($"{HOST}/grade/detection", content);

        Console.WriteLine($"回應: {await response.Content.ReadAsStringAsync()}");
    }

    static string Sha256(string str) {
        byte[] bytes = SHA256.HashData(Encoding.UTF8.GetBytes(str));
        return BitConverter.ToString(bytes).Replace("-", "").ToLower();
    }
}
- 執行環境
- Unity 2020 LTS 以上版本
- Scripting Backend:Mono 或 IL2CPP 均可
- API Compatibility Level:.NET Standard 2.1(推薦)
步驟一:準備圖片文件
- 在 Unity 專案中建立目錄:
Assets/
└── StreamingAssets/
|    └── target.jpg
└── Scripts/
     └── GrageImage.cs
- 按照 Assets 目錄名稱
- 建立腳本 GrageImage.cs,複製下面範例程式碼
- 準備一張圖片目標測試圖
using System;
using System.IO;
using System.Text;
using UnityEngine;
using UnityEngine.Networking;
using System.Collections;

public class GrageImage : MonoBehaviour
{
    [Header("Config")]
    public string apiUrl = "https://Your-Server-end-URL" + "/grade/detection";
    public string authorizationToken = "YOUR API KEY AUTH TOKEN";
    public string imageFilePath = "target.jpg";   // StreamingAssets
    public string crsAppId = "<Your-CRS-AppId>";

    private void Start()
    {
        StartCoroutine(Grade());
    }

    private IEnumerator Grade()
    {
        // 讀取圖片檔案(Unity StreamingAssets)
        string fullPath = Path.Combine(Application.streamingAssetsPath, imageFilePath);

        if (!File.Exists(fullPath))
        {
            Debug.LogError($"Image file not found: {fullPath}");
            yield break;
        }

        byte[] imageBytes = File.ReadAllBytes(fullPath);
        string imageBase64 = Convert.ToBase64String(imageBytes);

        TargetRequestBody body = new TargetRequestBody
        {
            appId = crsAppId,
            image = imageBase64,
        };

        string json = JsonUtility.ToJson(body);

        // UnityWebRequest
        UnityWebRequest request = new UnityWebRequest(apiUrl, "POST");
        byte[] jsonBytes = Encoding.UTF8.GetBytes(json);

        request.uploadHandler = new UploadHandlerRaw(jsonBytes);
        request.downloadHandler = new DownloadHandlerBuffer();
        request.SetRequestHeader("Content-Type", "application/json");
        request.SetRequestHeader("Authorization", authorizationToken);

        yield return request.SendWebRequest();

        if (request.result == UnityWebRequest.Result.Success)
        {
            Debug.Log("Grade detail success:");
            Debug.Log(request.downloadHandler.text);
        }
        else
        {
            Debug.LogError("Grade detail failed:");
            Debug.LogError(request.error);
            Debug.LogError(request.downloadHandler.text);
        }
    }

    [Serializable]
    private class TargetRequestBody
    {
        public string appId;
        public string image;
    }
}
- 在 Unity Editor 中:
- 建立一個空的 GameObject
- 命名為 GradeImage
- 將 GrageImage 腳本拖曳到該物件上
步驟三:設定參數(Inspector)
在 Inspector 面板中修改。按照前面準備清單的數據修改。
- Api Url
- Authorization Token
- Image File Path : 預設 target.jpg
- CRS AppId
只需修改這四項即可執行,填入準備清單準備好的參數
步驟四:執行
- 點擊 Play
- 在 Console 中查看結果:
- 成功:返回 JSON(result 含有物件)
- 失敗:HTTP / 錯誤訊息
相關主題:
下一主題: