xr-frame runtime で AR scene の 3D コンテンツを読み込む方法
この記事では、xr-frame の resource loading と node mounting の分離メカニズムを詳しく説明します。動的 script により、3D コンテンツを Block node の下へ柔軟に mounting し、AR を実現します。
公式資料
- xr-frame 開発ガイド: WeChat 公式 XR engine ドキュメント。
- xr-frame 公式サンプル: 各種基本および高度な使用例を含みます。
公式資料には runtime で 3D コンテンツを読み込む方法について十分な説明があります。この記事では AR scene でよく使われる内容と読み込み方法を簡単に説明します。
Resource loading vs node mounting
xr-frame で 3D model を表示するには 2 つの段階があります:
Resource loading:
.glbなどの model file をネットワークまたはローカルから download し、memory に parse します。この時点で model は準備済みですが、scene には表示されません。Node mounting: scene tree 内に node を作成し、読み込み済み resource をその node に関連付けます。この時点で model が rendering canvas に正式に表示されます。
コードで 3D コンテンツを動的に読み込む方法
Resource loading
xr-frame scene の resource management system から loadAsset を呼び出して resource を手動で読み込みます。
パラメータの
typeは resource type、assetIdは読み込み後の resource id、srcは resource の url を指し、通常は resource hosting server のアドレスです。後続の mounting と resource release のために
assetIdを記録する必要があります。try { await scene.assets.loadAsset({type: 'gltf', assetId: 'panda', src: 'url/EasyARPanda.glb'}); } catch (err) { console.error(`Failed to load assets: ${err.message}`); }Node mounting
element.addChild()を使用して、読み込み済み model を ShadowRoot の下に配置します。const root = scene.getElementById("shadow-root"); let panda = scene.createElement(xrFrameSystem.XRGLTF, { "model": "panda", "anim-autoplay": "" } ); root.addChild(panda);ShadowRoot 要素は、動的に node を作成および削除するために xr-frame が専用で用意した root node です。詳細は Shadow nodeを参照してください。
plugin object が提供する createXRNodeFromNodeAnnotation メソッドを使用すると、EMA data に基づいて Block の child node を作成でき、3D コンテンツを正しい空間位置に表示できます。
const nodeAnnotation = annotation as easyar.ema.v0_5.Node;
const xrNode: xrfs.XRNode = easyarPlugin.createXRNodeFromNodeAnnotation(nodeAnnotation, blockHolder);
let panda = scene.createElement(xrFrameSystem.XRGLTF,
    {
        "model": "panda",
        "anim-autoplay": ""
    }
);
xrNode.addChild(panda);
annotation を使わず Block の下に直接コンテンツを mounting する方法
警告
この方法を使用する前提は、その LocalTransform の値が xr-frame coordinate system で期待する rendering effect を実現できることを確認済みであることです。
それ以外の場合は、Unity Editor の annotation 機能を使用してください。
getBlockById(id) を通じて scene tree 上の block node object を取得します。対応する block node が存在しない場合、この Block の localization がまだ成功していないことを意味します(初めてその Block に localization したとき node は自動作成されます)。holdBlock(blockInfo, blockTransformInput) を使用してこの Block の node を作成することも、localization callback でこの Block の localization 成功を判断してからコンテンツを mounting することもできます。
ヒント
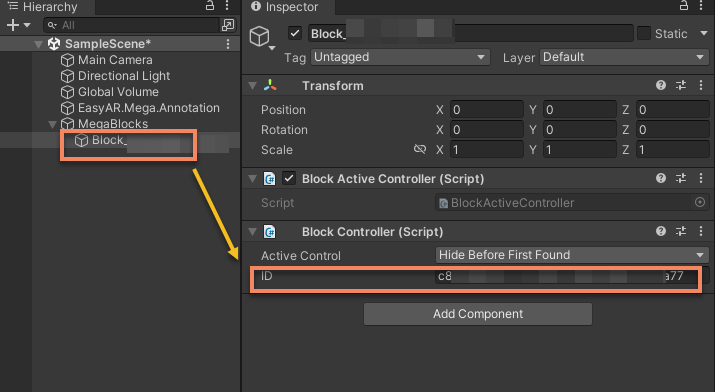
Unity Editor の scene tree で Block node を選択し、Inspector panel に表示される ID を記録します
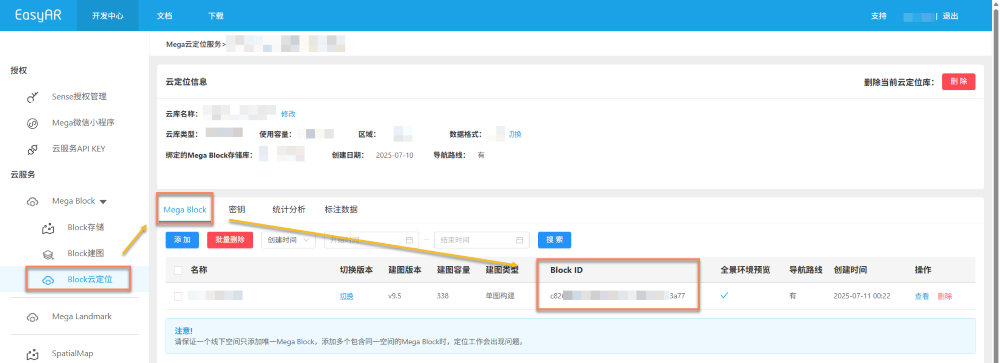
cloud localization library ページでも Block ID を確認できます
const blockID = "aaaa1234-bbbb-cccc-dddd-eeeeee123456"
if (!blockHolder.getBlockById(blockParent.id)) {
    // 既存の Block ノードがないため作成
    blockHolder.holdBlock({
        id: blockID
    })
}
let blockElement = blockHolder.getBlockById(blockParent.id).el;
model node を指定した Block の下に mounting し、position.setArray()、quaternion.set()、scale.setArray() を使用して model node の LocalTransform を変更します。
export interface LocalTransform {
    /** @description 位置 */
    position: xrfs.Vector3;
    /** @description 回転 */
    rotation: xrfs.Quaternion;
    /** @description Scale */
    scale: xrfs.Vector3;
}

// Block 配下に既知の LocalTransform があると仮定
const targetTransform: LocalTransform;

blockElement.addChild(modelNode);
let modelTransform = modelNode.getComponent(xrFrameSystem.Transform);
    modelTransform.position.setArray([
        targetTransform.position.x,
        targetTransform.position.y,
        targetTransform.position.z
    ]);
    let annoRotation = new xrFrameSystem.Quaternion().setValue(
        targetTransform.rotation.x,
        targetTransform.rotation.y,
        targetTransform.rotation.z,
        targetTransform.rotation.w
    );
    modelTransform.quaternion.set(annoRotation);
    modelTransform.scale.setArray([
        targetTransform.scale.x,
        targetTransform.scale.y,
        targetTransform.scale.z
    ]);
xr-frame がサポートする resource type
- Texture texture と画像
- CubeTexture cube texture
- VideoTexture video texture
- EnvData environment
- GLTF models
- Keyframe frame animation
- Atlas
各 resource の loading 方法の詳細は WeChat 公式ドキュメントおよび xr-frame 公式サンプルを参照してください
注記
サポートされる GLTF format と extension については xr-frame 公式 GLTF 使用説明を参照してください