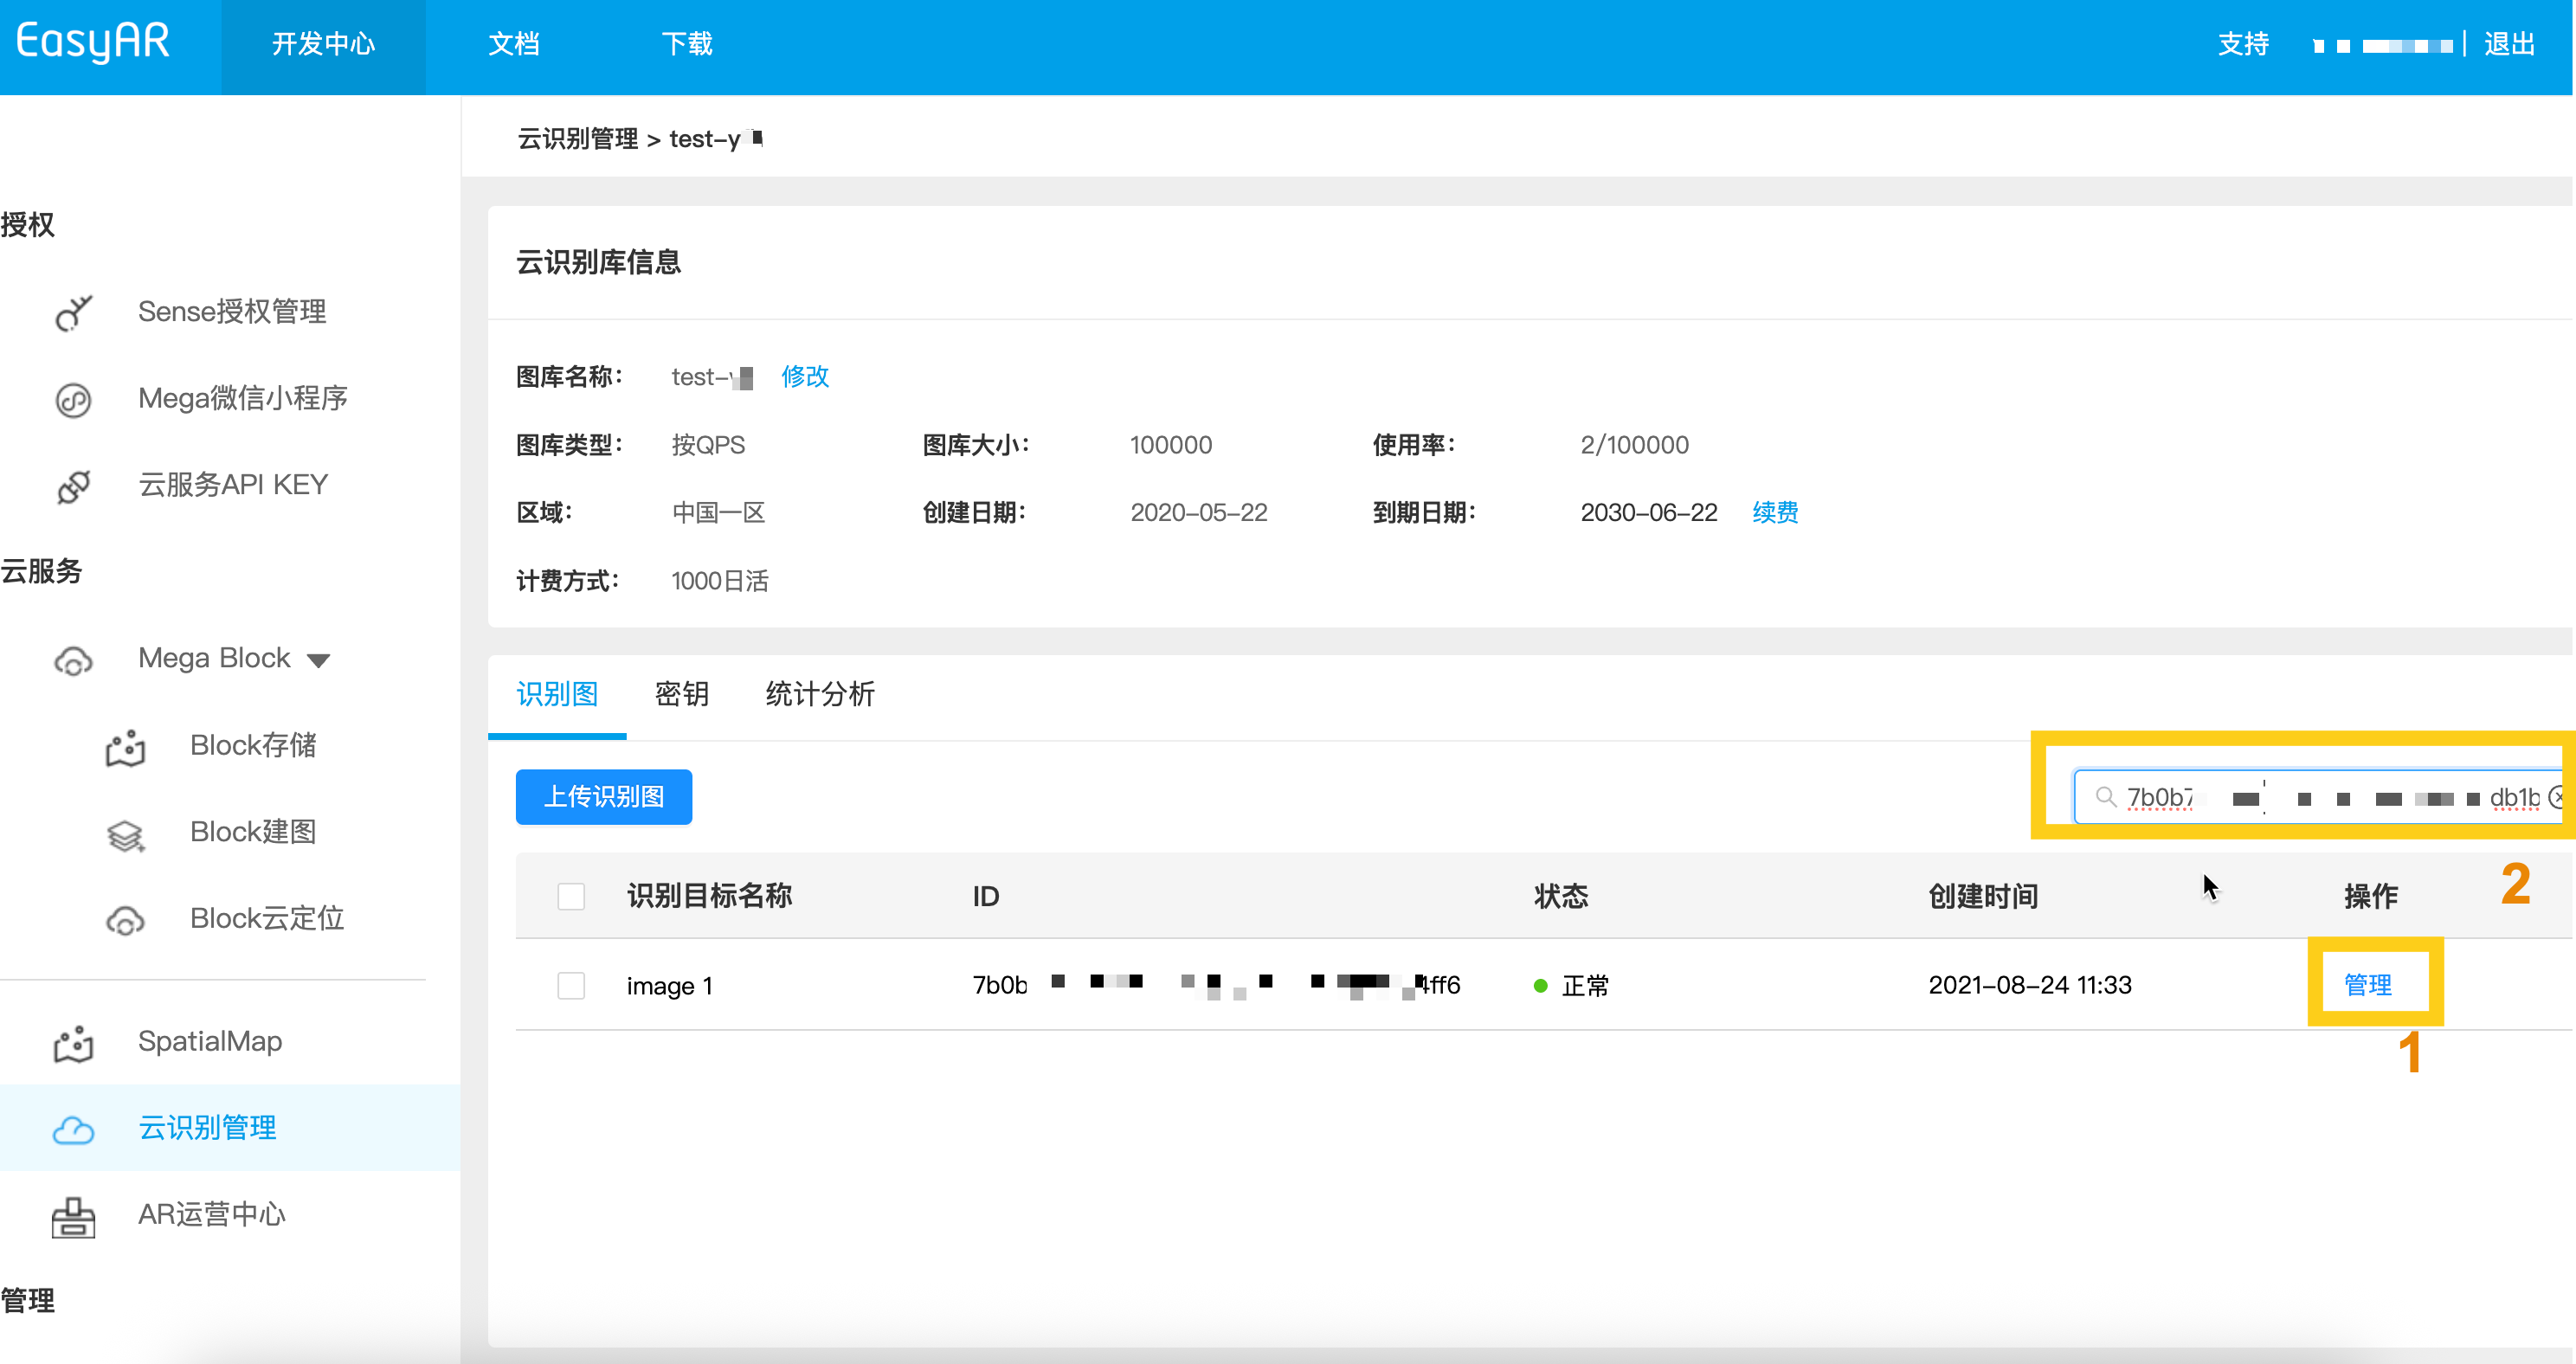
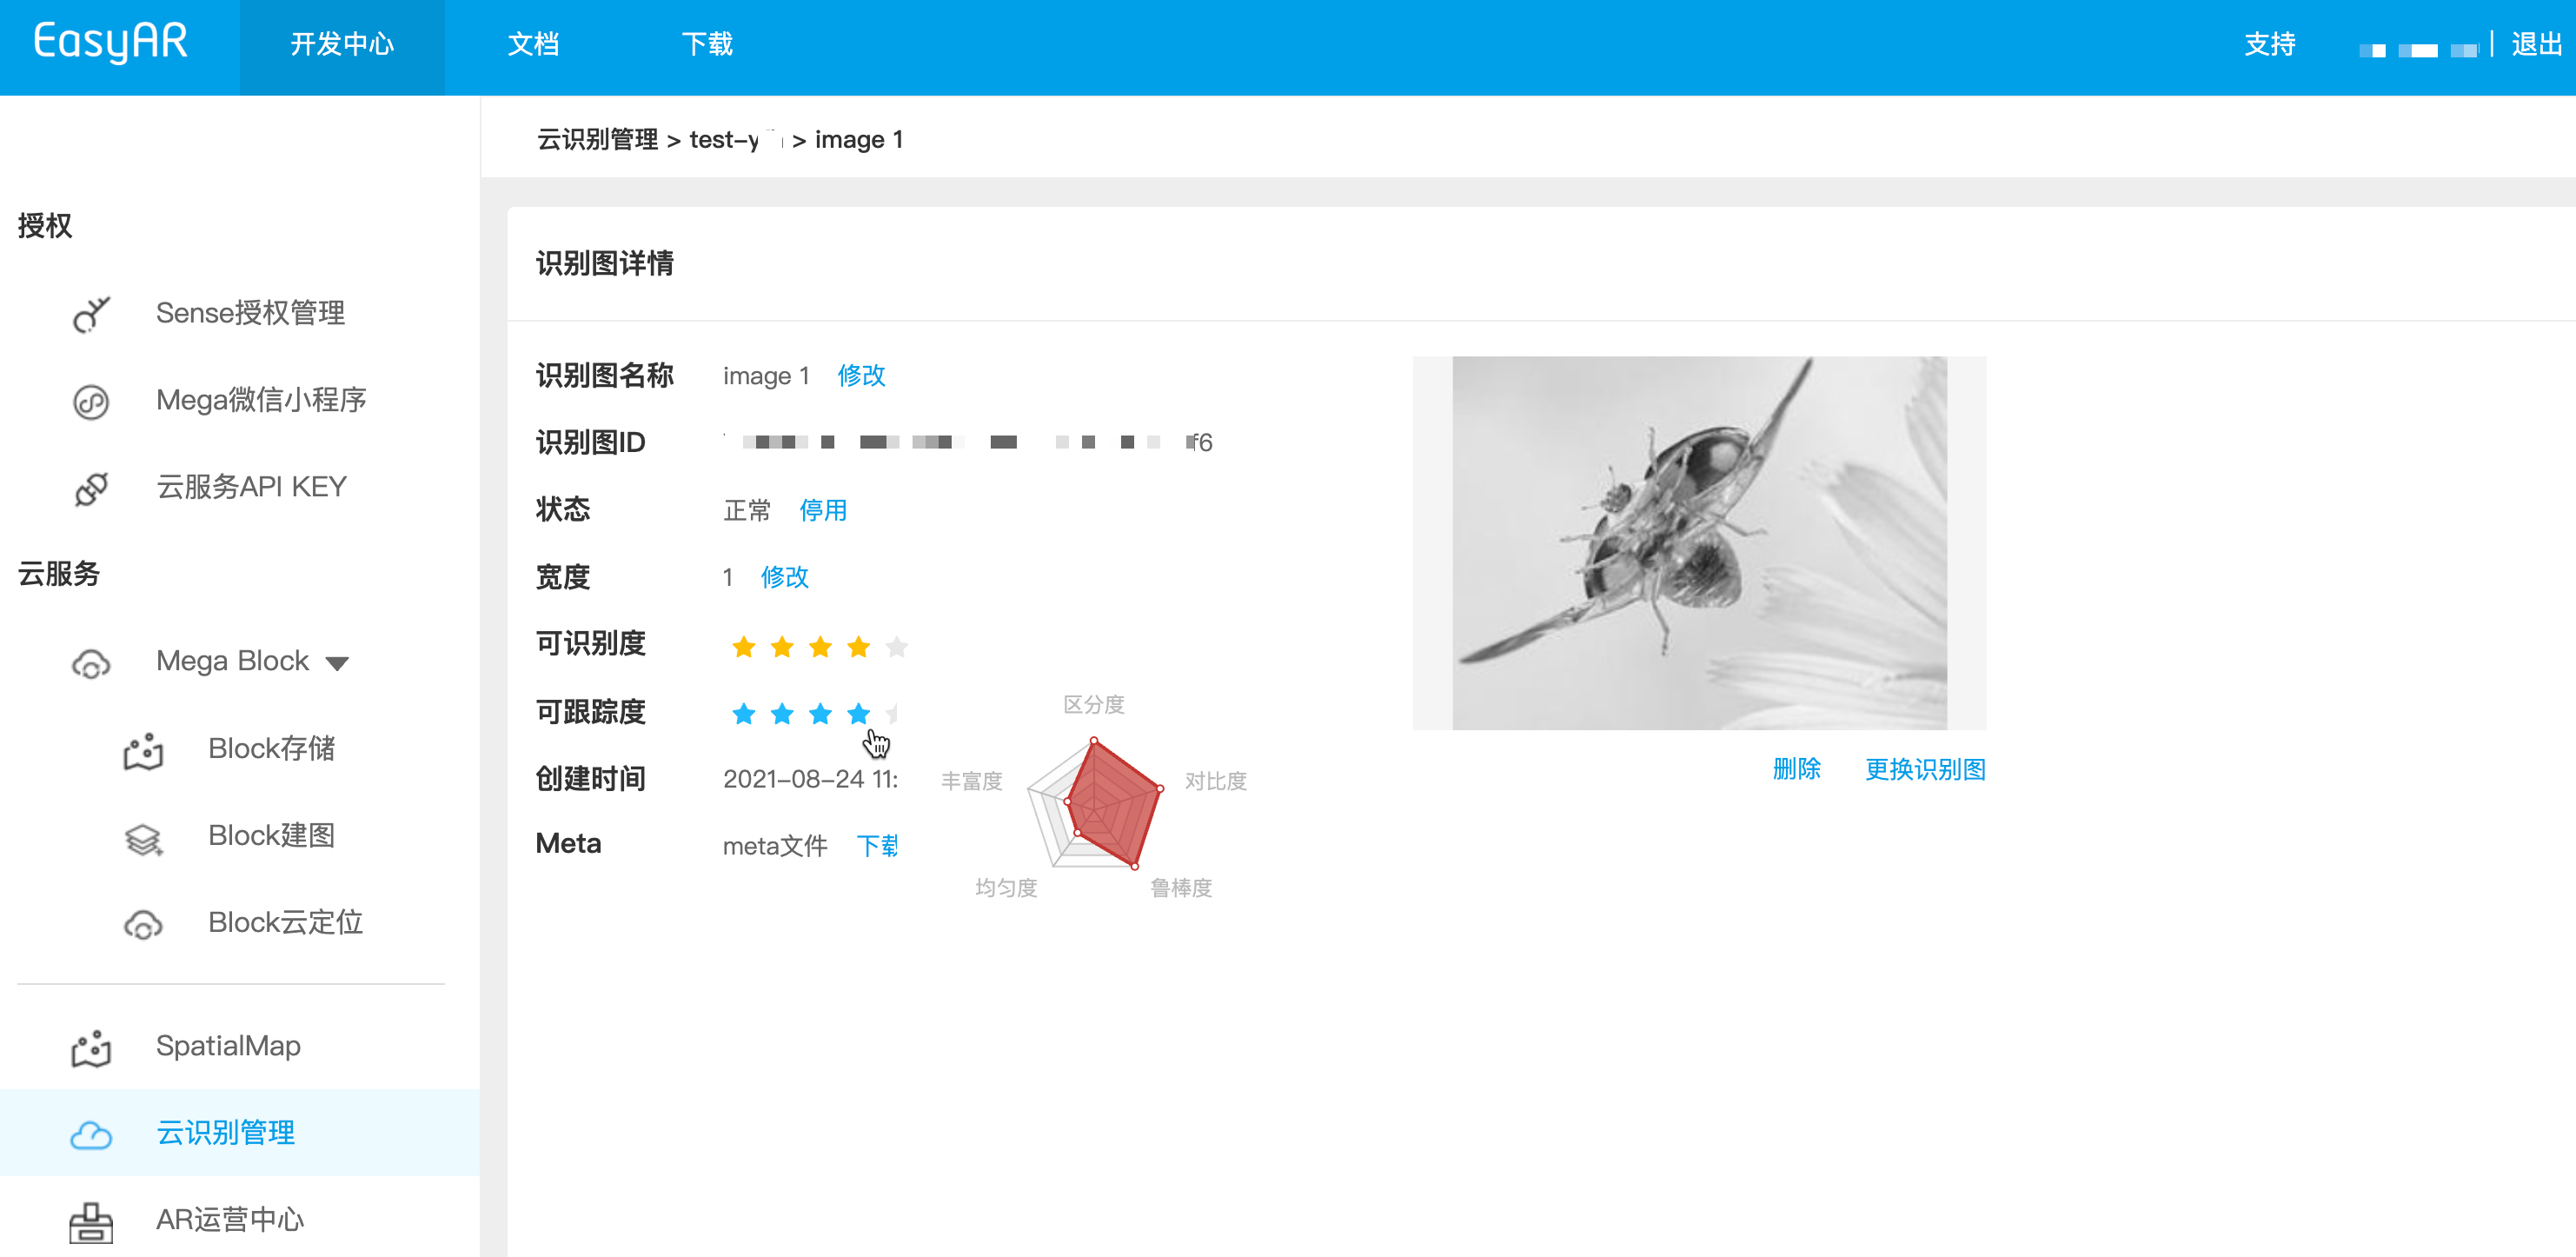
Cloud Recognition (CRS) 데이터베이스에는 일반적으로 대량의 타깃 이미지가 저장됩니다. 개발자가 이러한 데이터를 빠르게 찾고 관리할 수 있도록, 이 장에서는 타깃 이미지 보기, 페이지별 조회 및 상세 설명을 소개합니다.
이 인터페이스에서 다음 작업을 수행할 수 있습니다.
상세 페이지에 들어간 후에는 타깃 이미지의 전체 속성을 확인할 수 있습니다. 포함 항목:
자체 backend에 통합해야 하는 개발자는 REST API를 사용하여 관리하는 것을 권장합니다.
플레이스홀더를 실제 매개변수로 바꾸고 curl 스크립트를 실행하십시오
- Your-Server-side-URL → 실제 API Host
- Your-Token → 실제 API Key Authorization Token
- Your-CRS-AppId → 사용자의 appId
curl -X GET "https://<Your Server-side-URL>/targets/infos?appId=<Your-CRS-AppId>" \
  -H "Content-Type: application/json" \
  -H "Authorization: <Your-Token>"
Java 샘플 코드를 다운로드합니다
Maven 방식으로 프로젝트를 가져옵니다
Step 1. 관련 코드 파일 ListTargets.java를 엽니다.
Step 2. 전역 변수를 수정하고 준비한 목록의 인증 매개변수로 교체합니다.
- CRS AppId
- API Key / API Secret
- TARGET_MGMT_URL → Server-end URL
public class ListTargets {

    private static final String TARGET_MGMT_URL = "http://cn1.crs.easyar.com:8888";
    private static final String CRS_APPID       = "--here is your CRS AppId--";
    private static final String API_KEY         = "--here is your API Key--";
    private static final String API_SECRET      = "--here is your API Secret--";

    public String list(Auth auth) throws IOException {
        OkHttpClient client = new OkHttpClient.Builder().build();
        JSONObject params = new JSONObject();
        Auth.signParam(params, auth.getAppId(), auth.getApiKey(), auth.getApiSecret());
        okhttp3.Request request = new okhttp3.Request.Builder()
                .url(auth.getCloudURL() + "/targets/infos?"+ Common.toParam(params))
                .get()
                .build();
        Response response = client.newCall(request).execute();
        return response.body().string();
    }
    public static void main(String[] args) throws IOException{
        Auth accessInfo  =  new Auth(CRS_APPID, API_KEY, API_SECRET, TARGET_MGMT_URL);
        System.out.println(new ListTargets().list(accessInfo));
    }

}
Step 3. Main을 실행합니다
NodeJS sample code를 다운로드합니다.
Step 1. 키 파일 keys.json을 구성합니다.
- CRS AppId
- API Key / API Secret
{
  "appId": "--here is your appId for CRS App Instance for SDK 4--",
  "apiKey": "--here is your api key which is create from website and which has crs permission--",
  "apiSecret": "--here is your api secret which is create from website--"
}
Step 2. 키 파일과 Server-end URL을 지정하여 실행합니다.
node bin/getTargets -t <Server-end-URL> -c keys.json
pagination 전략을 변경해야 하는 경우 getTargets pagination 매개변수를 전달합니다.
- 'pageSize': 페이지 크기
- 'pageNum': 페이지 번호
var argv = require('yargs')
    .usage('Usage: $0 [targetId] -t [host] -c [keys]')
    .demand(0)
    .default('t', 'http://localhost:8888').alias('t', 'host')
    .default('c', 'keys.json').alias('c', 'keys')
    .help('h').alias('h', 'help')
    .epilog('copyright 2015, sightp.com')
    .argv;

var fs = require('fs');
var host = argv.host;
var keys = JSON.parse(fs.readFileSync(argv.keys));
var farmer = require('../farmer')(host, keys.appKey, keys.appSecret);

farmer.getTargets({
  'pageSize': 5,
  'pageNum': 1,
})
.then(function(resp) {
    console.log(resp.result.targets);
})
.fail(function(err) {
    console.log(err);
});
getTargets는 클라우드 서비스 API를 호출합니다. sample code는 farmer.js에 있습니다.
function getTargetsByPage(pageNum,pageSize) {
    return Q.promise(function(resolve, reject) {
        request.get(host + '/targets/infos?pageNum=' + pageNum + '&pageSize=' + pageSize)
        .query(auth.signParams(keypair, {
            "pageNum":pageNum,
            "pageSize":pageSize
        }))
        .end(done(resolve, reject));
    });
}
PHP 샘플 코드를 다운로드합니다.
Step 1. 엔트리 코드 demo.php를 엽니다.
Step 2. 전역 변수를 수정하고 준비한 목록의 인증 매개변수로 바꿉니다.
- CRS AppId
- API Key / API Secret
- Server-end URL
<?php
include 'EasyARClientSdkCRS.php';
$apiKey = 'API Key';
$apiSecret = 'API Secret';
$crsAppId = 'CRS AppId'
$crsCloudUrl = 'https://cn1-crs.easyar.com';
$pageNum = 1;
$pageSize = 5;

$sdk = new EasyARClientSdkCRS($apiKey, $apiSecret, $crsAppId, $crsCloudUrl);

$rs = $sdk->targetsV3($pageNum, $pageSize);
if ($rs->statusCode == 0) {
    print_r($rs->result);
} else {
    print_r($rs);
}
Step 3. php demo.php를 실행합니다.
관련 코드 파일 list_targets.py를 만들고 전역 변수를 수정한 다음 실행합니다
pip install requests
python list_targets.py
import time
import hashlib
import requests

# --- Global Configuration ---
API_KEY = "YOUR_API_KEY"
API_SECRET = "YOUR_API_SECRET"
APP_ID = "YOUR_APP_ID"
HOST = "https://crs-cn1.easyar.com"

def main():
    timestamp = str(int(time.time() * 1000))

    params = {
        'apiKey': API_KEY,
        'appId': APP_ID,
        'timestamp': timestamp
    }

    # Signature: Sort keys -> Concat -> Append Secret -> SHA256
    sorted_keys = sorted(params.keys())
    sign_str = "".join([f"{k}{params[k]}" for k in sorted_keys]) + API_SECRET
    signature = hashlib.sha256(sign_str.encode('utf-8')).hexdigest()

    url = f"{HOST}/targets/infos"
    params['signature'] = signature

    print(f"Requesting GET {url}...")
    response = requests.get(url, params=params)
    print(f"Response: {response.text}")

if __name__ == "__main__":
    main()
관련 코드 파일 main.go를 만들고 전역 변수를 수정한 다음 실행합니다
go run main.go
main.go:
package main
import (
"crypto/sha256"
"fmt"
"io"
"net/http"
"sort"
"strconv"
"time"
)
// --- Global Configuration ---
var (
ApiKey = "YOUR_API_KEY"
ApiSecret = "YOUR_API_SECRET"
AppId = "YOUR_APP_ID"
Host = "https://crs-cn1.easyar.com"
)
func main() {
ts := strconv.FormatInt(time.Now().UnixNano()/1e6, 10)
params := map[string]string{
"apiKey": ApiKey,
"appId": AppId,
"timestamp": ts,
}
keys := make([]string, 0, len(params))
for k := range params { keys = append(keys, k) }
sort.Strings(keys)
builder := ""
for _, k := range keys { builder += k + params[k] }
builder += ApiSecret
signature := fmt.Sprintf("%x", sha256.Sum256([]byte(builder)))
url := fmt.Sprintf("%s/targets/infos?apiKey=%s&appId=%s×tamp=%s&signature=%s",
Host, ApiKey, AppId, ts, signature)
resp, _ := http.Get(url)
defer resp.Body.Close()
body, _ := io.ReadAll(resp.Body)
fmt.Printf("Response: %s\n", string(body))
}
Cargo.toml에 reqwest, tokio, sha2, hex dependency를 추가합니다.
cargo run을 실행합니다.
use sha2::{Sha256, Digest};
use std::collections::BTreeMap;
use std::time::{SystemTime, UNIX_EPOCH};
// --- Global Configuration ---
const API_KEY: &str = "YOUR_API_KEY";
const API_SECRET: &str = "YOUR_API_SECRET";
const APP_ID: &str = "YOUR_APP_ID";
const HOST: &str = "https://crs-cn1.easyar.com";
#[tokio::main]
async fn main() -> Result<(), Box<dyn std::error::Error>> {
let ts = SystemTime::now().duration_since(UNIX_EPOCH)?.as_millis().to_string();
let mut params = BTreeMap::new();
params.insert("apiKey", API_KEY);
params.insert("appId", APP_ID);
params.insert("timestamp", &ts);
let mut sign_str = String::new();
for (k, v) in ¶ms {
sign_str.push_str(k);
sign_str.push_str(v);
}
sign_str.push_str(API_SECRET);
let mut hasher = Sha256::new();
hasher.update(sign_str.as_bytes());
let signature = hex::encode(hasher.finalize());
let url = format!("{}/targets/infos?apiKey={}&appId={}×tamp={}&signature={}",
HOST, API_KEY, APP_ID, ts, signature);
let res = reqwest::get(url).await?;
println!("Response: {}", res.text().await?);
Ok(())
}
.NET 콘솔 프로젝트를 만듭니다.
dotnet new console
dotnet run
using System;
using System.Collections.Generic;
using System.Linq;
using System.Security.Cryptography;
using System.Text;
using System.Net.Http;

class Program {
    // --- Global Configuration ---
    static string API_KEY = "YOUR_API_KEY";
    static string API_SECRET = "YOUR_API_SECRET";
    static string APP_ID = "YOUR_APP_ID";
    static string HOST = "https://crs-cn1.easyar.com";

    static async System.Threading.Tasks.Task Main() {
        string timestamp = DateTimeOffset.Now.ToUnixTimeMilliseconds().ToString();

        var dict = new SortedDictionary<string, string> {
            { "apiKey", API_KEY },
            { "appId", APP_ID },
            { "timestamp", timestamp }
        };

        StringBuilder sb = new StringBuilder();
        foreach (var kv in dict) sb.Append(kv.Key).Append(kv.Value);
        sb.Append(API_SECRET);

        string signature = Sha256(sb.ToString());

        using var client = new HttpClient();
        string query = string.Join("&", dict.Select(x => $"{x.Key}={x.Value}")) + $"&signature={signature}";
        string url = $"{HOST}/targets/infos?{query}";

        var response = await client.GetAsync(url);
        Console.WriteLine($"Result: {await response.Content.ReadAsStringAsync()}");
    }

    static string Sha256(string str) {
        byte[] bytes = SHA256.HashData(Encoding.UTF8.GetBytes(str));
        return BitConverter.ToString(bytes).Replace("-", "").ToLower();
    }
}
- 실행 환경
- Unity 2020 LTS 이상 버전
- Scripting Backend: Mono 또는 IL2CPP 모두 가능
- API Compatibility Level: .NET Standard 2.1(권장)
Step 1: 이미지 파일 준비
Assets/
└── Scripts/
     └── ListImageTarget.cs
using System.Collections;
using UnityEngine;
using UnityEngine.Networking;

public class ListImageTarget : MonoBehaviour
{
    [Header("Config")]
    public string apiBaseUrl = "https://Your-Server-end-URL";
    public string authorizationToken = "YOUR API KEY AUTH TOKEN";
    public string crsAppId = "CRS-AppId";
    public int pageSize = 5;
    public int pageNum  = 1;

    private void Start()
    {
        StartCoroutine(ListTarget());
    }

    private IEnumerator ListTarget()
    {

        string url =
            $"{apiBaseUrl}/targets/infos?appId={crsAppId}&pageSize={pageSize}&pageNum={pageNum}";

        UnityWebRequest request = UnityWebRequest.Get(url);
        request.downloadHandler = new DownloadHandlerBuffer();

        request.SetRequestHeader("Content-Type", "application/json");
        request.SetRequestHeader("Authorization", authorizationToken);

        yield return request.SendWebRequest();

        if (request.result == UnityWebRequest.Result.Success)
        {
            Debug.Log("List target success:");
            Debug.Log(request.downloadHandler.text);
        }
        else
        {
            Debug.LogError("List target failed:");
            Debug.LogError(request.error);
            Debug.LogError(request.downloadHandler.text);
        }
    }
}
Assets 디렉터리 이름에 따라
- 아래 샘플 코드를 복사합니다 ListImageTarget.cs
Unity Editor에서:
- 빈 GameObject를 만듭니다
- 이름을 지정합니다 ListTarget
- 스크립트를 이 오브젝트에 드래그합니다
Step 3: 매개변수 구성(Inspector)
Step 4: 실행
- Play를 클릭합니다
- Console에서 결과를 확인합니다.
- 성공: JSON(targetId 포함) 반환
- 실패: HTTP / 오류 정보