How to load 3D content in AR scenarios at runtime in xr-frame
이 문서는 xr-frame의 리소스 로딩과 노드 마운팅의 분리 메커니즘을 상세히 설명하며, 스크립트를 통해 동적으로 3D 콘텐츠를 Block 노드 아래에 유연하게 마운팅하여 AR을 구현하는 방법을 다룹니다.
공식 자료
- xr-frame 개발 가이드: WeChat 공식 XR 엔진 문서.
- xr-frame 공식 샘플: 다양한 기본 및 고급 사용법 예제 포함.
공식 자료에는 런타임에 3D 콘텐츠를 로드하는 방법에 대한 충분한 설명이 이미 있습니다. 본 문서에서는 AR 시나리오에서 자주 사용되는 콘텐츠와 로딩 방식에 대해 간략히 설명합니다.
리소스 로딩 vs 노드 마운팅
xr-frame에서 3D 모델을 표시하는 것은 두 단계로 나뉩니다:
리소스 로딩: 모델 파일(예:
.glb)을 네트워크 또는 로컬에서 다운로드하고 메모리로 파싱합니다. 이때 모델은 준비되었지만 장면에는 보이지 않습니다.노드 마운팅: 장면 트리에 노드를 생성하고 로드된 리소스를 해당 노드에 연결합니다. 이때 모델이 렌더링 캔버스에 나타납니다.
코드로 동적으로 3D 콘텐츠를 로드하는 방법
리소스 로딩
xr-frame 장면의 리소스 관리 시스템을 통해 loadAsset을 수동으로 호출하여 리소스를 로드합니다.
매개변수에서
type은 리소스 유형,assetId는 로드 후의 리소스 ID,src는 리소스 URL로 일반적으로 리소스 호스팅 서버의 주소입니다.후속 마운팅 및 리소스 해제를 위해
assetId를 기록해야 합니다.try { await scene.assets.loadAsset({type: 'gltf', assetId: 'panda', src: 'url/EasyARPanda.glb'}); } catch (err) { console.error(`Failed to load assets: ${err.message}`); }노드 마운팅
element.addChild()를 사용하여 로드된 모델을 ShadowRoot 아래에 배치합니다.const root = scene.getElementById("shadow-root"); let panda = scene.createElement(xrFrameSystem.XRGLTF, { "model": "panda", "anim-autoplay": "" } ); root.addChild(panda);ShadowRoot 요소는 xr-frame에서 동적으로 노드를 생성 및 제거하기 위해 특별히 설계된 루트 노드입니다. 자세한 내용은 Shadow 노드를 참조하세요.
플러그인 객체에서 제공하는 createXRNodeFromNodeAnnotation 메서드를 사용하면 EMA 데이터를 기반으로 Block의 자식 노드를 생성하여 3D 콘텐츠가 올바른 공간 위치에 표시되도록 할 수 있습니다.
const nodeAnnotation = annotation as easyar.ema.v0_5.Node;
const xrNode: xrfs.XRNode = easyarPlugin.createXRNodeFromNodeAnnotation(nodeAnnotation, blockHolder);
let panda = scene.createElement(xrFrameSystem.XRGLTF,
    {
        "model": "panda",
        "anim-autoplay": ""
    }
);
xrNode.addChild(panda);
How to mount content directly under Block without using annotations
경고
이 방법을 사용하기 전에 해당 LocalTransform 값이 xr-frame 좌표계에서 예상된 렌더링 효과를 달성할 수 있는지 확인해야 합니다.
그 외의 경우에는 Unity 에디터의 주석 기능 사용을 통해 구현하세요.
getBlockById(id)를 사용하여 장면 트리의 block 노드 객체를 가져옵니다. 해당 block 노드가 존재하지 않으면 해당 Block에 대한 위치 추적이 아직 성공하지 못한 것입니다(Block이 처음 위치 추적될 때 노드가 자동으로 생성됨). holdBlock(blockInfo, blockTransformInput)을 사용하여 해당 Block의 노드를 생성하거나, 위치 추적 콜백에서 해당 Block의 위치 추적 성공 여부를 판단한 후 콘텐츠를 마운팅할 수 있습니다.
팁
Unity 에디터의 장면 트리에서 Block 노드를 선택하고 Inspector 패널에 표시된 ID를 기록하세요.
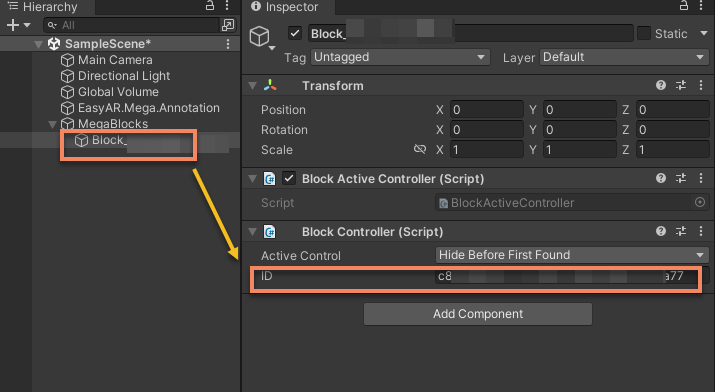
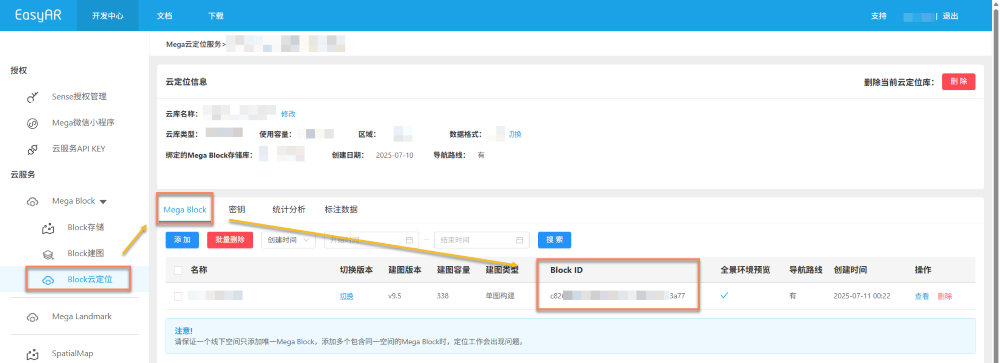
클라우드 위치 추적 라이브러리 페이지에서도 Block ID를 확인할 수 있습니다.
const blockID = "aaaa1234-bbbb-cccc-dddd-eeeeee123456"
if (!blockHolder.getBlockById(blockParent.id)) {
    // 존재하는 Block 노드가 없으므로 생성
    blockHolder.holdBlock({
        id: blockID
    })
}
let blockElement = blockHolder.getBlockById(blockParent.id).el;
모델 노드를 지정된 Block 아래에 마운팅하고 position.setArray(), quaternion.set(), scale.setArray()를 사용하여 모델 노드의 LocalTransform을 수정합니다.
export interface LocalTransform {
    /** @description 위치 */
    position: xrfs.Vector3;
    /** @description 회전 */
    rotation: xrfs.Quaternion;
    /** @description 스케일 */
    scale: xrfs.Vector3;
}

// Block 아래에 알려진 LocalTransform이 있다고 가정
const targetTransform: LocalTransform;

blockElement.addChild(modelNode);
let modelTransform = modelNode.getComponent(xrFrameSystem.Transform);
    modelTransform.position.setArray([
        targetTransform.position.x,
        targetTransform.position.y,
        targetTransform.position.z
    ]);
    let annoRotation = new xrFrameSystem.Quaternion().setValue(
        targetTransform.rotation.x,
        targetTransform.rotation.y,
        targetTransform.rotation.z,
        targetTransform.rotation.w
    );
    modelTransform.quaternion.set(annoRotation);
    modelTransform.scale.setArray([
        targetTransform.scale.x,
        targetTransform.scale.y,
        targetTransform.scale.z
    ]);
xr-frame에서 지원하는 리소스 유형
- Texture 텍스처 및 이미지
- CubeTexture 큐브 텍스처
- VideoTexture 비디오 텍스처
- EnvData 환경
- GLTF 모델
- Keyframe 키프레임 애니메이션
- Atlas 아틀라스
각 리소스의 로딩 방법은 WeChat 공식 문서 및 xr-frame 공식 샘플을 참조하세요.
참고
지원되는 GLTF 형식 및 확장은 xr-frame 공식 GLTF 사용 설명서를 참조하세요.