AR 인식의 안정성과 정확성을 보장하려면 텍스처가 풍부하고 특징점이 뚜렷하며 흐릿한 영역이 없는 이미지를 업로드하는 것이 좋습니다.
운영 환경에서는 개발자가 직접 강제 업로드 대신 다음 3단계 방법을 통해 API로 타겟 이미지를 자동 관리하는 것을 강력히 권장합니다.
공식 추가 전에 현재 이미지 라이브러리에 동일하거나 지나치게 유사한 타겟이 이미 존재하는지 확인합니다.
알고리즘을 활용하여 이미지가 인식 타겟 이미지로 적합한지 사전 판단합니다.
위 두 검사를 통과한 후 안전하게 업로드 작업을 실행할 수 있습니다.
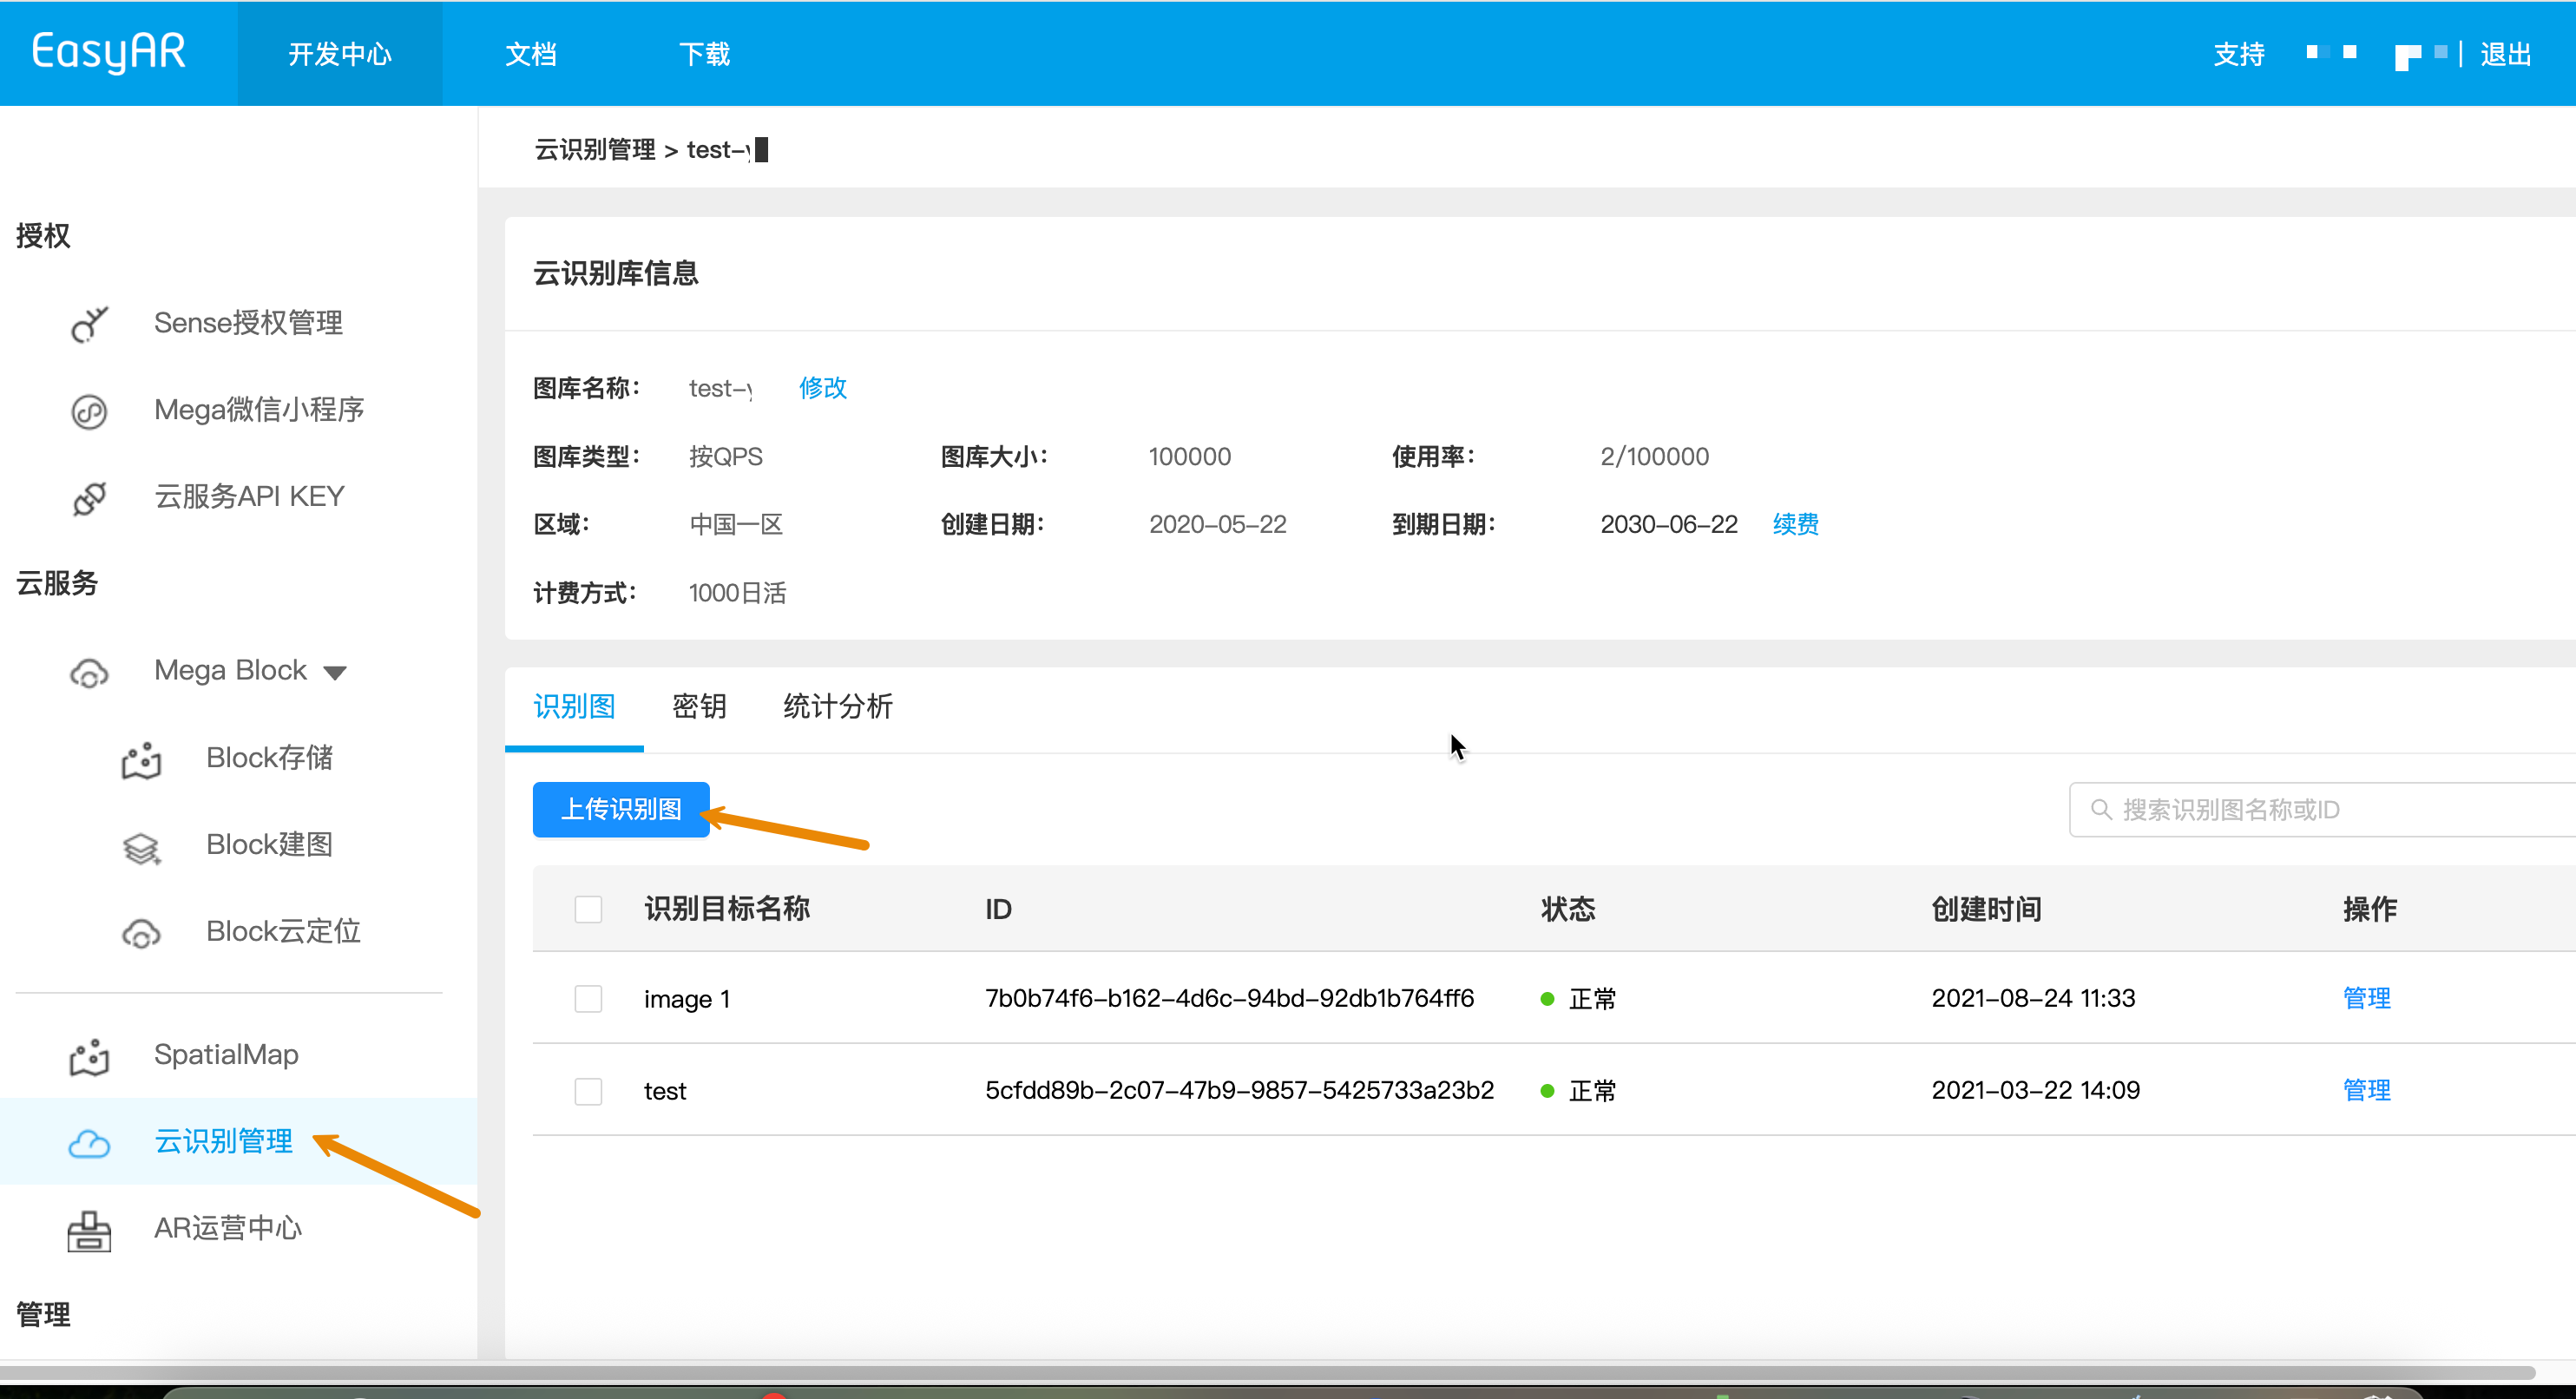
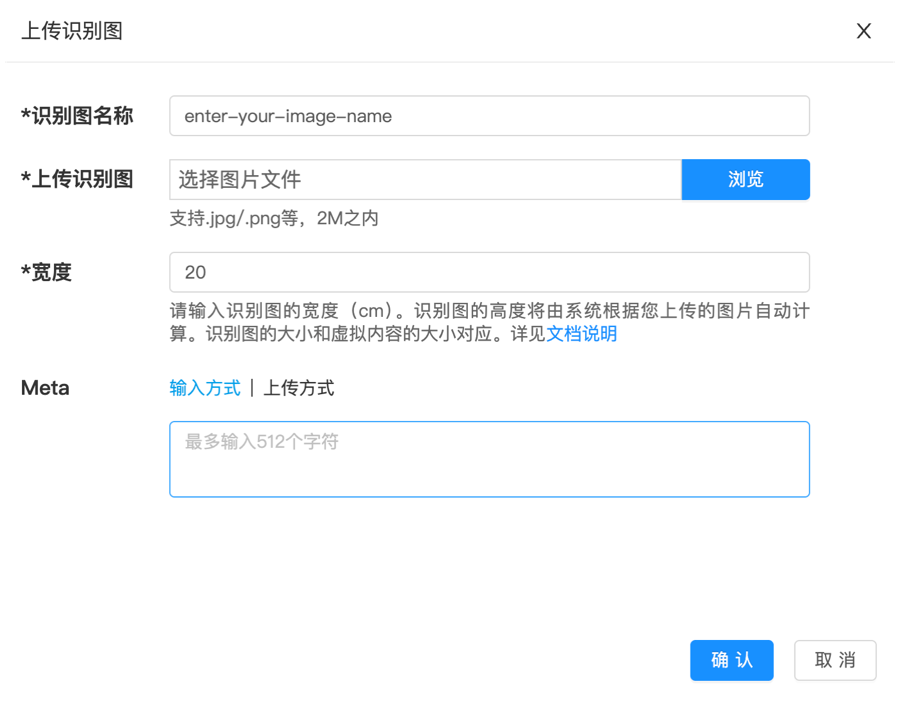
검증 단계 또는 소량의 타겟 이미지 유지보수에 적합합니다. Web 관리 콘솔은 "강제 생성" 모드를 채택하여 자동 유사성 검증을 수행하지 않으며, 이미지 인식 가능성도 검사하지 않습니다.
대규모 관리 또는 자체 백엔드 통합이 필요한 경우 Web Service REST API를 사용하여 자동 생성하세요.
- 먼저 로컬 대상 이미지를 Base64로 변환합니다(macOS/Linux). 결과는 image_base64.txt에 저장합니다
base64 -i ./target.jpg | tr -d '\n' > image_base64.txt
- 자리 표시자를 실제 매개변수로 대체하고 curl 스크립트를 실행합니다
- Your-Server-side-URL → 실제 API 호스트
- Your-Token → 실제 API Key 인증 토큰
- Your-CRS-AppId → 귀하의 appId
- demo_target → 대상 이름
- size → 대상 이미지 너비(cm)
curl -X POST "https://<Your-Server-side-URL>/targets" \
  -H "Content-Type: application/json" \
  -H "Authorization: <YOUR-TOKEN>" \
  -d '{
    "appId": "<Your-CRS-AppId>",
    "image": "'"$(cat image_base64.txt)"'",
    "active": "1",
    "name": "demo_target",
    "size": "20",
    "type": "ImageTarget",
    "allowSimilar": "1"
  }'
Java 예제 코드 다운로드
Maven 방식으로 프로젝트 가져오기
Step 1. 관련 코드 파일 CreateTarget.java 열기
Step 2. 전역 변수 수정, 준비한 목록의 인증 파라미터로 대체
- CRS AppId
- API Key / API Secret
- Server-end URL
- IMAGE_PATH : 업로드 대상 이미지 파일
public class CreateTarget {

    private static final String TARGET_MGMT_URL = "http://cn1.crs.easyar.com:8888";
    private static final String CRS_APPID       = "--here is your CRS AppId--";
    private static final String API_KEY         = "--here is your API Key--";
    private static final String API_SECRET      = "--here is your API Secret--";
    private static final String IMAGE_PATH      = "test_target_image.jpg";

    public String create(Auth auth, String imgPath) throws IOException{
        byte[] image = Files.readAllBytes(Paths.get(imgPath));
        if(image.length > Common.MAXIMUM_SIZE) {
            System.err.println("maximum image size is 2MB");
            System.exit(-1);
        }
        JSONObject params = new JSONObject()
                .put("name", "java-sdk-test")
                .put("image", Base64.getEncoder().encodeToString(image))
                .put("type","ImageTarget")
                .put("size", "20")
                .put("meta", "Your customized meta info");
        RequestBody requestBody = FormBody.create(MediaType.parse("application/json; charset=utf-8"),
                Auth.signParam(params, auth.getAppId(), auth.getApiKey(), auth.getApiSecret()).toString());
        Request request = new Request.Builder()
                .url(auth.getCloudURL() + "/targets")
                .post(requestBody)
                .build();
        return new OkHttpClient.Builder().readTimeout(120,TimeUnit.SECONDS).build().newCall(request).execute().body().string();
    }

    public static void main(String[] args) throws IOException {
        Auth accessInfo  =  new Auth(CRS_APPID, API_KEY, API_SECRET, TARGET_MGMT_URL);
        JSONObject createResponse = new JSONObject(new CreateTarget().create(accessInfo, IMAGE_PATH)).getJSONObject(Common.KEY_RESULT);
        System.out.println("created target: "+ createResponse.getString(Common.KEY_TARGETID));
    }
}
Step 3. 메인 실행
NodeJS 샘플 코드 다운로드
Step 1. 키 파일 구성 keys.json
- CRS AppId
- API Key / API Secret
{
  "appId": "--here is your appId for CRS App Instance for SDK 4--",
  "apiKey": "--here is your api key which is create from website and which has crs permission--",
  "apiSecret": "--here is your api secret which is create from website--"
}
Step 2. 실행, 테스트 이미지, 키 파일 및 서버 엔드 URL 지정
node bin/addTarget test.jpeg -t <Server-end-URL> -c keys.json
[선택] 타겟 이미지 파라미터 코드
타겟 이미지 추가 로직, 코드 파일 addTarget.js 수정
타겟 이미지 파라미터 편집, 예: meta, 타겟 이미지 이름 등, createTarget 메소드에 전달되는 익명 target 구조에 대응
var argv = require('yargs')
    .usage('Usage: $0 [image] -t [host] -c [keys]')
    .demand(1)
    .default('t', 'http://localhost:8888').alias('t', 'host')
    .default('c', 'keys.json').alias('c', 'keys')
    .help('h').alias('h', 'help')
    .epilog('copyright 2015, sightp.com')
    .argv;

var fs = require('fs');

var imageFn = argv._[0];
var host = argv.host;
var keys = JSON.parse(fs.readFileSync(argv.keys));

var farmer = require('../farmer')(host, keys.appKey, keys.appSecret);

farmer.createTarget({
    'image': fs.readFileSync(imageFn).toString('base64'),
    'name':'test2',
    'allowSimilar': '1',
    'active':'1',
    'size':'20',
    'type':'imageTarget'
})
.then(function(resp) {
    console.log(resp.result.targetId);
})
.fail(function(err) {
    console.log(err);
});
createTarget 클라우드 서비스 인터페이스 호출, 샘플 코드는 farmer.js에 있음
function createTarget(target) {
    return Q.promise(function(resolve, reject) {
        request.post(host + '/targets')
        .send(signParams(target))
        .end(done(resolve, reject));
    });
}
해당 코드 파일 create_target.py 생성, 전역 변수 수정, 그리고 실행
pip install requests
python create_target.py
import base64, hashlib, json, time, requests

APP_ID = "your_app_id"
API_KEY = "your_api_key"
API_SECRET = "your_api_secret"
IMAGE_PATH = "test.jpg"
API_HOST = "https://cn1-crs.easyar.com"

def sha256_hex(s: str) -> str:
    return hashlib.sha256(s.encode()).hexdigest()

image_b64 = base64.b64encode(open(IMAGE_PATH, "rb").read()).decode()
timestamp = int(time.time() * 1000)

sign_params = {
    "image": image_b64,
    "name": "demo_target",
    "size": "20",
    "meta": "",
    "type": "ImageTarget",
    "timestamp": timestamp,
    "appId": APP_ID,
    "apiKey": API_KEY
}

sign_str = "".join(f"{k}{sign_params[k]}" for k in sorted(sign_params)) + API_SECRET
print(sign_str)
signature = sha256_hex(sign_str)

body = dict(sign_params)
body["signature"] = signature

headers = {
    "Content-Type": "application/json",
    "appId": APP_ID
}

resp = requests.post(f"{API_HOST}/targets", headers=headers, json=body)
print(resp.text)
다운로드 Php 샘플 코드
1단계: 진입 코드 demo.php 열기
2단계: 전역 변수 수정, 준비 목록의 인증 매개변수 교체
- CRS AppId
- API Key / API Secret
- 서버-종단 URL
- imageFilePath : 업로드할 타깃 이미지 파일 경로
<?php
include 'EasyARClientSdkCRS.php';
$apiKey = 'API Key';
$apiSecret = 'API Secret';
$crsAppId = 'CRS AppId'
$crsCloudUrl = 'https://cn1-crs.easyar.com';
$imageFilePath = '1.jpg'

$sdk = new EasyARClientSdkCRS($apiKey, $apiSecret, $crsAppId, $crsCloudUrl);

$params = [
  'name' => 'image 1',
  'active' => '1',
  'size' => '1',
  'meta' => base64_encode('hello world'),
  'image' => base64_encode(file_get_contents($imageFilePath)),
];

$rs = $sdk->targetAdd($params);
if ($rs->statusCode == 0) {
  print_r($rs->result);
} else {
  print_r($rs);
}
3단계: php demo.php 실행
Cargo.toml:
[dependencies]
reqwest = { version = "0.11", features = ["json"] }
serde_json = "1"
sha2 = "0.10"
base64 = "0.21"
tokio = { version = "1", features = ["full"] }
main.rs:
use std::{fs, collections::BTreeMap};
use sha2::{Sha256, Digest};
use base64::Engine;
use reqwest::Client;
use std::time::{SystemTime, UNIX_EPOCH};

const APP_ID: &str = "your_app_id";
const API_KEY: &str = "your_api_key";
const API_SECRET: &str = "your_api_secret";
const IMAGE_PATH: &str = "test.jpg";
const API_HOST: &str = "https://cn1-crs.easyar.com";

fn sha256_hex(s: &str) -> String {
    let mut h = Sha256::new();
    h.update(s.as_bytes());
    format!("{:x}", h.finalize())
}

#[tokio::main]
async fn main() {
    let img = fs::read(IMAGE_PATH).unwrap();
    let image_b64 = base64::engine::general_purpose::STANDARD.encode(img);
    let timestamp = SystemTime::now()
        .duration_since(UNIX_EPOCH).unwrap()
        .as_millis();

    let mut sign = BTreeMap::new();
    sign.insert("image", image_b64);
    sign.insert("name", "demo_target".into());
    sign.insert("size", "20".into());
    sign.insert("meta", "".into());
    sign.insert("type", "ImageTarget".into());
    sign.insert("timestamp", timestamp.to_string());
    sign.insert("appId", APP_ID.into());
    sign.insert("apiKey", API_KEY.into());

    let mut raw = String::new();
    for (k, v) in &sign {
        raw.push_str(&format!("{}{}", k, v));
    }
    raw.push_str(API_SECRET);

    sign.insert("active", "1".into());
    sign.insert("signature", sha256_hex(&raw));

    let client = Client::new();
    let resp = client.post(format!("{}/targets", API_HOST))
        .header("Content-Type", "application/json")
        .header("appId", APP_ID)
        .json(&sign)
        .send().await.unwrap()
        .text().await.unwrap();

    println!("{}", resp);
}
cargo run
관련 코드 파일 main.go를 생성하고, 전역 변수를 수정한 다음 실행합니다
go run main.go
main.go:
package main

import (
  "bytes"
  "crypto/sha256"
  "encoding/base64"
  "encoding/json"
  "fmt"
  "os"
  "sort"
  "net/http"
  "time"
)

const (
  AppID     = "your_app_id"
  ApiKey    = "your_api_key"
  ApiSecret = "your_api_secret"
  ImagePath = "test.jpg"
  ApiHost   = "https://cn1-crs.easyar.com"
)

func sha256Hex(s string) string {
  sum := sha256.Sum256([]byte(s))
  return fmt.Sprintf("%x", sum)
}

func main() {
  img, _ := os.ReadFile(ImagePath)
  imageB64 := base64.StdEncoding.EncodeToString(img)
  timestamp := time.Now().UnixMilli()

  sign := map[string]string{
    "image":     imageB64,
    "name":      "demo_target",
    "size":      "20",
    "meta":      "",
    "type":      "ImageTarget",
    "timestamp": fmt.Sprint(timestamp),
    "appId":     AppID,
    "apiKey":    ApiKey,
  }

  keys := make([]string, 0, len(sign))
  for k := range sign { keys = append(keys, k) }
  sort.Strings(keys)

  builder := ""
  for _, k := range keys {
    builder += k + sign[k]
  }
  builder += ApiSecret

  signature := sha256Hex(builder)
  sign["signature"] = signature

  body, _ := json.Marshal(sign)

  req, _ := http.NewRequest("POST", ApiHost+"/targets", bytes.NewReader(body))
  req.Header.Set("Content-Type", "application/json")

  resp, _ := http.DefaultClient.Do(req)
  defer resp.Body.Close()

  buf := new(bytes.Buffer)
  buf.ReadFrom(resp.Body)
  fmt.Println(buf.String())
}
.NET 콘솔 프로젝트 생성.
dotnet new console
dotnet run
using System;
using System.IO;
using System.Net.Http;
using System.Security.Cryptography;
using System.Text;
using System.Text.Json;
using System.Collections.Generic;
using System.Linq;

class Program
{
    const string APP_ID = "your_app_id";
    const string API_KEY = "your_api_key";
    const string API_SECRET = "your_api_secret";
    const string IMAGE_PATH = "test.jpg";
    const string API_HOST = "https://cn1-crs.easyar.com";

    static string Sha256(string s)
    {
        return Convert.ToHexString(
            SHA256.HashData(Encoding.UTF8.GetBytes(s))
        ).ToLower();
    }

    static void Main()
    {
        var imageB64 = Convert.ToBase64String(File.ReadAllBytes(IMAGE_PATH));
        var timestamp = DateTimeOffset.UtcNow.ToUnixTimeMilliseconds();

        var sign = new SortedDictionary<string, string> {
            ["image"] = imageB64,
            ["name"] = "demo_target",
            ["size"] = "20",
            ["type"] = "ImageTarget",
            ["timestamp"] = timestamp.ToString(),
            ["appId"] = APP_ID,
            ["apiKey"] = API_KEY
        };

        var builder = string.Concat(sign.Select(p => p.Key + p.Value)) + API_SECRET;
        sign["signature"] = Sha256(builder);

        var json = JsonSerializer.Serialize(sign);
        var client = new HttpClient();

        var resp = client.PostAsync(
            API_HOST + "/targets",
            new StringContent(json, Encoding.UTF8, "application/json")
        ).Result;

        Console.WriteLine(resp.Content.ReadAsStringAsync().Result);
    }
}
- 실행 환경
- Unity 2020 LTS 이상 버전
- Scripting Backend: Mono 또는 IL2CPP 모두 가능
- API Compatibility Level: .NET Standard 2.1 (권장)
Step 1: 이미지 파일 준비
Assets/
└── StreamingAssets/
|    └── target.jpg
└── Scripts/
     └── CreateImageTarget.cs
- Assets 디렉토리명에 맞춰
- CreateImageTarget.cs 스크립트 생성, 아래 예제 코드 복사
- 이미지 타겟 테스트용 그림 한 장 준비
using System;
using System.IO;
using System.Text;
using UnityEngine;
using UnityEngine.Networking;
using System.Collections;

public class CreateImageTarget : MonoBehaviour
{
    [Header("Config")]
    public string apiUrl = "https://Your-Server-end-URL" + "/targets";
    public string authorizationToken = "YOUR API KEY AUTH TOKEN";
    public string imageFilePath = "target.jpg";   // StreamingAssets
    public string crsAppId = "<Your-CRS-AppId>";

    private void Start()
    {
        StartCoroutine(CreateTarget());
    }

    private IEnumerator CreateTarget()
    {
        // 이미지 파일 읽기 (Unity StreamingAssets)
        string fullPath = Path.Combine(Application.streamingAssetsPath, imageFilePath);

        if (!File.Exists(fullPath))
        {
            Debug.LogError($"Image file not found: {fullPath}");
            yield break;
        }

        byte[] imageBytes = File.ReadAllBytes(fullPath);
        string imageBase64 = Convert.ToBase64String(imageBytes);

        TargetRequestBody body = new TargetRequestBody
        {
            appId = crsAppId,
            image = imageBase64,
            active = "1",
            name = "unity_target",
            size = "20",
            meta = "created from unity",
            type = "ImageTarget",
            allowSimilar = "1"
        };

        string json = JsonUtility.ToJson(body);

        // UnityWebRequest
        UnityWebRequest request = new UnityWebRequest(apiUrl, "POST");
        byte[] jsonBytes = Encoding.UTF8.GetBytes(json);

        request.uploadHandler = new UploadHandlerRaw(jsonBytes);
        request.downloadHandler = new DownloadHandlerBuffer();
        request.SetRequestHeader("Content-Type", "application/json");
        request.SetRequestHeader("Authorization", authorizationToken);

        yield return request.SendWebRequest();

        if (request.result == UnityWebRequest.Result.Success)
        {
            Debug.Log("Create target success:");
            Debug.Log(request.downloadHandler.text);
        }
        else
        {
            Debug.LogError("Create target failed:");
            Debug.LogError(request.error);
            Debug.LogError(request.downloadHandler.text);
        }
    }

    [Serializable]
    private class TargetRequestBody
    {
        public string appId;
        public string image;
        public string active;
        public string name;
        public string size;
        public string meta;
        public string type;
        public string allowSimilar;
    }
}
- Unity Editor에서:
- 빈 GameObject 생성
- 이름을 TargetUploader로 지정
- CreateImageTarget 스크립트를 해당 객체에 드래그 앤 드롭
Step 3: 파라미터 설정 (Inspector)
Step 4: 실행
- Play 버튼 클릭
- Console에서 결과 확인:
- 성공: JSON 반환 (targetId 포함)
- 실패: HTTP/오류 메시지