WeChat Mini Program Mega 플러그인 샘플 프로젝트 설명
이 문서는 샘플 프로젝트에서 보여 주는 각 기능의 사용 방법, 구현 방식 및 주의 사항을 자세히 설명합니다.
시작하기 전에
- Unity 에디터를 사용하여 annotation을 생성하고 업로드할 수 있으며, annotation 이름과 ID를 기록할 수 있어야 합니다.
- Unity 에디터를 사용하여 실제 환경과 정렬된 3D 콘텐츠를 생성할 수 있어야 합니다.
- 샘플 프로젝트를 완전히 실행할 수 있어야 합니다.
annotation 위치에 모델을 표시하는 방법
Unity 에디터에서 주석을 정밀하게 배치하고 업로드한 뒤 주석 이름과 ID를 기록
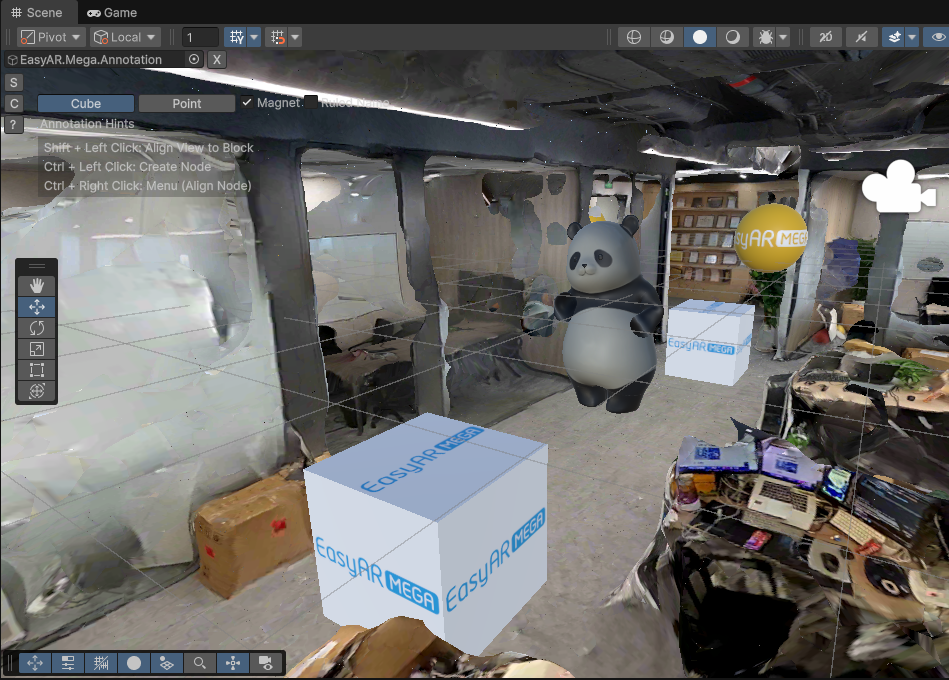
GLTF 모델 리소스 추가
miniprogram/components/sample-easyar-mega/index.ts의sampleAssets에 모델 리소스를 추가합니다.const sampleAssets = { your_model_name: { assetId: "your_model_asset_id", type: "gltf", src: "url/model.glb", options: {} } }추가한 모델 리소스 로드
miniprogram/components/sample-easyar-mega/index.ts의loadAsset()함수에서 모델을 로드합니다.async loadAsset() { try { await scene.assets.loadAsset(sampleAssets.your_model_name); } catch (err) { console.error(`Failed to load assets: ${err.message}`); } }교체할 주석 구성
miniprogram/components/sample-data/annotation-metadata.ts에서 교체할 주석을 구성합니다. 여러 개를 교체하려면 쉼표로 구분합니다.export const AnnotationMetaData: Record<string, any> = { "aaaaaaaa-bbbb-cccc-dddd-123456789012": { assetId: "panda", scale: "0.5 0.5 0.5" }, "aaaaaaaa-bbbb-cccc-dddd-123456789013": { assetId: "your_model_asset_id", scale: "1 1 1" } };주석을 교체하고 모델 로드
EMA 로드 콜백에서 xr-frame의 "factory method"
scene.createElement(xrFrameSystem.XRGLTF, options)를 사용하여 모델 노드를 만듭니다.매개변수:
xrFrameSystem.XRGLTF: 생성할 요소 타입이 GLTF 모델임을 지정합니다.options: 컴포넌트 속성에 대응하는 초기화 구성 항목입니다.
코드의 주요 속성:
"model": 필수입니다. 로드된 리소스 ID(asset-id)를 가리킵니다."anim-autoplay": 선택 사항입니다. 로드 후 자동 재생할 애니메이션 이름을 지정합니다."scale": 선택 사항입니다.assetInfo.scale또는 "1 1 1".name: 필수입니다. 주석 이름입니다.
주의
속성 Key의 문자열과 비문자열을 구분하고 예시와 완전히 동일하게 입력하십시오.
xrNode.addChild(child)로 모델을 주석 노드 아래에 마운트합니다.GLTF 모델이 서로 다른 플랫폼의 로더에서 동일한 결과로 보이도록, 로드된 모델을 제자리에서 Y축 기준 180도 회전해야 합니다.
if (assetInfo && assetInfo.assetId && assetInfo.assetId.trim().length > 0) {
    model = scene.createElement(
        xrFrameSystem.XRGLTF,
        {
            /** 이전 단계의 assetId */
            "model": assetInfo.assetId,
            /** 여기에서 재생할 모델 애니메이션을 지정할 수 있습니다 */
            "anim-autoplay": assetInfo.animation ? assetInfo.animation : "",
            "scale": assetInfo.scale ? assetInfo.scale : "1 1 1",
            name: emaName
        }
    );
    xrNode.addChild(model);
    /**
     * GLTF 로더의 동작이 서로 다르므로 xr-frame에서의 모델 방향이 Unity의 렌더링 결과와 완전히 일치하도록 하기 위해,
     * 로드된 모델을 제자리에서 Y축 기준으로 180도 회전해야 합니다
     */
    let modelTransform = model.getComponent(xrFrameSystem.Transform);
    let currentRotation = modelTransform.quaternion.clone();
    let targetRotation = currentRotation.multiply(new xrFrameSystem.Quaternion().setValue(0, 1, 0, 0));
    modelTransform.quaternion.set(targetRotation);
}
실기기 실행
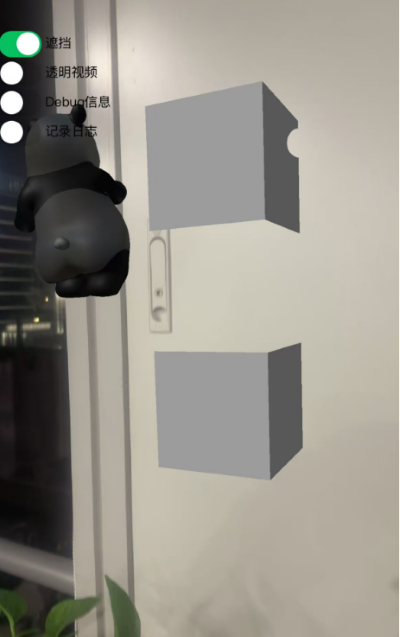
실기기 실행 결과는 아래와 같으며, 1단계의 Unity 에디터 위치와 비교할 수 있습니다.
왼쪽의 투명 동영상 버튼을 켜면 세계 좌표계 원점, 즉 좌표
(0, 0, 0)위치에 투명 동영상 머티리얼의 큐브가 나타납니다.참고
원점 위치는 공간의 임의 위치일 수 있습니다. 주석을 이용해 오클루전 모델을 원하는 위치에 배치할 수 있습니다. 자세한 내용은 Unity 에디터로 주석 생성 및 업로드를 참고하십시오.
왼쪽의 오클루전 버튼을 켜면 세계 좌표계 원점, 즉 좌표
(0, 0, 0)위치에 판다 모델과 위아래로 쌓인 큐브가 나타납니다. 가운데 큐브에는 오클루전 머티리얼이 있고, 다른 쪽에는 오클루전 머티리얼이 적용된 정적 판다 모델이 있습니다.참고
원점 위치는 공간의 임의 위치일 수 있습니다. 주석을 이용해 오클루전 모델을 원하는 위치에 배치할 수 있습니다. 자세한 내용은 Unity 에디터로 주석 생성 및 업로드를 참고하십시오.
annotation 위치에서 투명 비디오를 재생하는 방법
타입이
video-texture인 비디오 리소스 로드.async loadAsset() { const videoTexture = { assetId: "fireball", type: "video-texture", // 视频资源 URL src: "url/video-resource.mp4", options: { autoPlay: true, loop: true, } }; try { // 加载 video-texture 类型资源 await scene.assets.loadAsset(videoTexture); } catch (err) { console.error(`Failed to load video texture: ${err.message}`); } }EMA 로드 콜백 수정
EMA 로드 콜백에서
scene.createElement(xrFrameSystem.XRMesh,options)를 사용하여 간단한 지오메트리를 만들고easyar-video-tsbs재질을 부여한 다음uniform을u_baseColorMap:video-{$assetId}로 수정합니다.매개변수:
xrFrameSystem.XRMesh: 생성할 요소 타입을 기본 지오메트리로 지정합니다.options: 초기화 구성 항목이며 컴포넌트 속성에 대응합니다.
코드의 주요 속성:
"geometry": "cube": xr-frame 내장 큐브 지오메트리 데이터를 사용합니다."material": "easyar-video-tsbs": 미리 정의된 재질을 지정합니다. 이름으로 보아 비디오 텍스처를 지원하는 특수 재질로 추정됩니다."uniforms": "u_baseColorMap:video-{$assetId}":
주의
속성 Key의 문자열과 비문자열을 구분하고, 예시의 방식과 완전히 동일하게 입력하십시오.
이는 재질 매개변수의 동적 바인딩입니다.
video-{$assetId}라는 비디오 리소스(텍스처)를 재질의 base color map에 매핑합니다.효과: 표면에서 비디오가 재생되는 큐브가 생성됩니다.
model = scene.createElement(xrFrameSystem.XRMesh, {
    geometry: "cube",
    material: "easyar-video-tsbs",
    uniforms: "u_baseColorMap:video-fireball",
});
xrNode.addChild(model);
참고
video-texture를 사용할 때 console에wx.createVideoDecoder with type: 'wemedia' is deprecated경고가 나타나면 무시하십시오.WeChat 공식 팀과 확인한 결과, 이 경고는 사용에 영향을 주지 않습니다.
실기기에서 실행
공간과 정렬된 occlusion 모델을 배치하는 방법
occlusion에 사용할 모델을 정확히 배치하고 annotation을 업로드합니다.
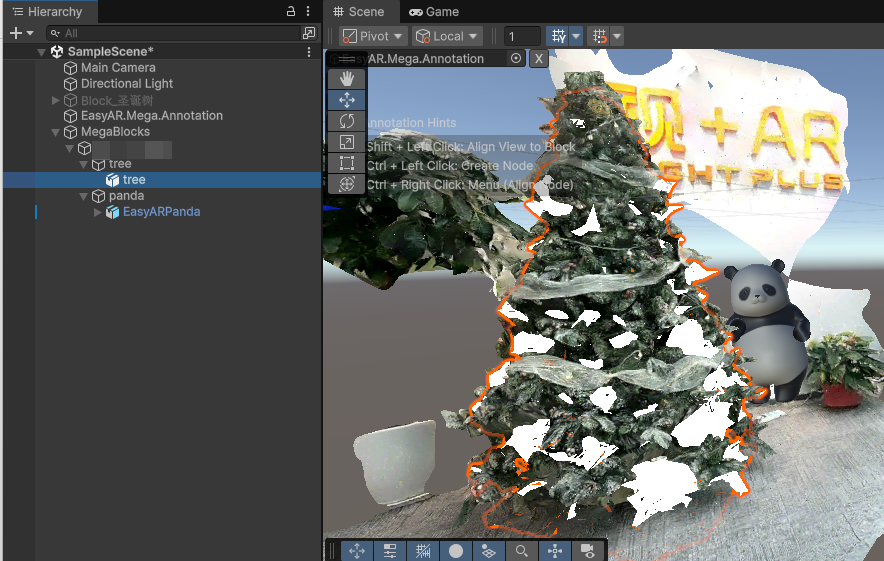
xr-frame Mini Program에서 occlusion으로 사용할 GLTF를 로드합니다.
scene.assets.loadAsset()를 통해 모델 리소스를 로드합니다(수동 unload 필요).const sampleAssets = { occlusion1: { assetId: "occlusion1", type: "gltf", src: "url/occlusion1.glb", options: {} } } async loadAsset() { if (!scene) {console.error("Empty scene"); return;} try { await scene.assets.loadAsset(sampleAssets.occlusion1); } catch (err) { console.error(`Failed to load assets: ${err.message}`); } }runtime에서 EMA 로드 callback 안에서 모델을 로드하고 occlusion material을 할당합니다
EMA 로드 callback에서
scene.createElement(xrFrameSystem.XRGLTF,options)를 사용해 모델 노드를 생성합니다.파라미터:
xrFrameSystem.XRGLTF: 생성할 요소 유형이 GLTF 모델임을 지정합니다.options: 초기화 구성 항목이며 컴포넌트 속성에 대응합니다.
코드의 핵심 속성:
"model": 필수, 로드된 리소스 ID(asset-id)를 가리킵니다."scale": 선택,assetInfo.scale또는 "1 1 1".name: 필수, annotation 이름.
주의
속성 Key의 문자열과 비문자열을 구분하고 예제 방식과 완전히 동일하게 입력하십시오.
xrNode.addChild(child)로 모델을 annotation 노드 아래에 마운트합니다.서로 다른 플랫폼의 GLTF loader에서 모델이 동일하게 보이도록 로드된 모델을 제자리에서 Y축 기준 180도 회전해야 합니다.
마지막으로
model.getComponent(xrFrameSystem.GLTF).meshes.forEach((m: any) => {m.setData({ neverCull: true, material: occlusionMaterial });}를 사용해 GLTF 모델 material을 수정합니다.참고
easyar-occulusionmaterial의 로드, 등록, 등록 해제, unload는 AR Session이 제어합니다.annotation 위치에서 모델을 occlusion으로 사용:
if (...) {
    model = scene.createElement(
        xrFrameSystem.XRGLTF,
        {
            "model": assetInfo.assetId,
            "scale": assetInfo.scale ? assetInfo.scale : "1 1 1",
            name: emaName
        }
    );
    /**
    * GLTF 로더의 동작이 서로 다르므로 xr-frame에서의 모델 방향이 Unity의 렌더링 결과와 완전히 일치하도록 하기 위해,
    * 로드된 모델을 제자리에서 Y축 기준으로 180도 회전해야 하는 경우가 있습니다
    */
    let modelTransform = model.getComponent(xrFrameSystem.Transform);
    let currentRotation = modelTransform.quaternion.clone();
    let targetRotation = currentRotation.multiply(new xrFrameSystem.Quaternion().setValue(0, 1, 0, 0));
    modelTransform.quaternion.set(targetRotation);
    // 주의: Transform을 수정한 뒤에 반드시 머티리얼을 수정해야 합니다
    if (assetInfo.assetId == 'occlusion1') {
        // Mega 플러그인이 제공하는 오클루전 머티리얼 가져오기
        let occlusionMaterial = scene.assets.getAsset("material", "easyar-occlusion");
        // 오클루전 머티리얼 수정
        model.getComponent(xrFrameSystem.GLTF).meshes.forEach((m: any) => {
            m.setData({ neverCull: true, material: occlusionMaterial });
        });
    }
}
실제 기기에서 실행
Unity editor에서 시뮬레이션 실행 결과와 비교할 수 있습니다.