Mega plugin 을 사용하여 occlusion 구현
Occlusion 은 AR 에서 virtual 및 real content 의 몰입형 융합을 향상시키는 핵심 기술입니다. 이 문서는 EasyAR cloud localization 과 annotations 를 통해 xr-frame environment 에서 occlusion effect 를 구현하는 방법을 안내합니다.
시작하기 전에
- Unity 에서 Mega Studio 사용할 수 있어야 합니다.
- Unity editor 로 annotations 를 생성하고 upload할 수 있어야 합니다.
- Real world 와 정렬된 content 생성할 수 있어야 합니다.
Occlusion 구현 방식
Offline modeling: Unity editor 를 사용하여 Block coordinate system 아래에서 wall, column, large equipment 같은 real-world entity 와 1:1 로 맞는 geometry 를 만들거나, Block dense model 을 cropping 및 face reduction 하여 optimized model 을 얻습니다.
Runtime alignment: xr-frame runtime 에서 cloud localization 을 통해 Block coordinate system 을 real space 와 정렬하고 해당 geometry 를 load 합니다.
Material replacement: 이러한 geometry 에 특수 occlusion materials 를 부여합니다.
Visual effect: GPU 가 다른 virtual objects 를 rendering 할 때 occluded parts 의 pixels 는 depth test 를 통과하지 못해 자동으로 제거되므로, virtual objects 가 실제 physical space 의 occlusion logic 을 따르게 됩니다.
Simple geometry 로 occlusion 배치하는 방법
dense model 및 panorama 와 대조하여 box annotations 를 정확히 배치합니다. 배치 후 annotation 은 "wall" 또는 "column" 처럼 보입니다.
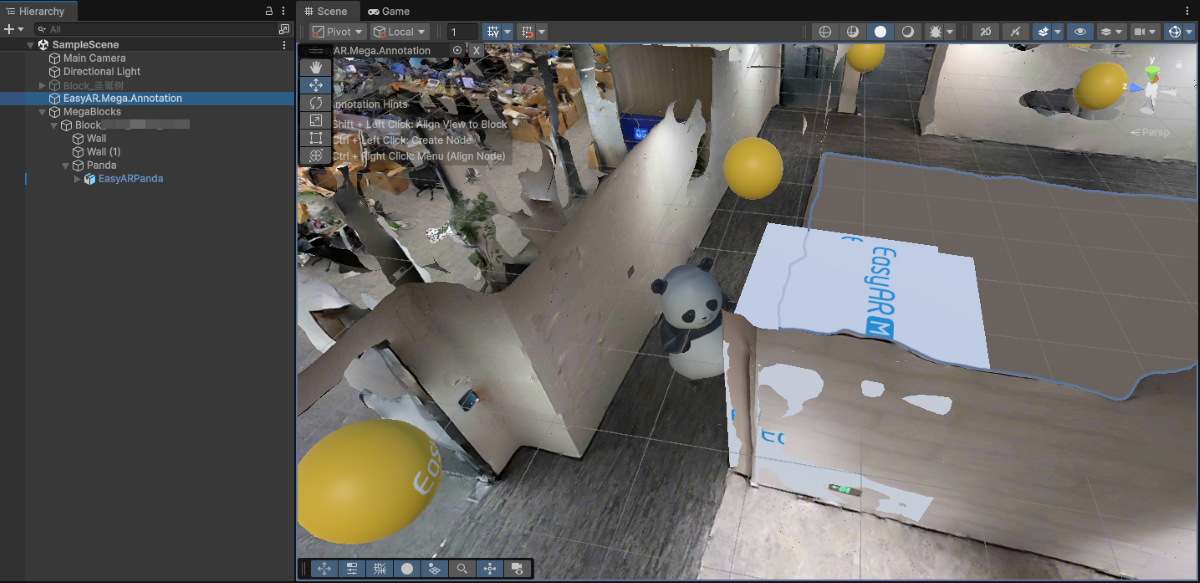
annotation 이름을
occlusion_wall등으로 수정하고 ID 를 기록한 뒤 annotation 을 upload 합니다.xr-frame Mini Program 에서 built-in geometry 를 사용하여 occlusion 으로 사용할 annotation 을 load 합니다.
EMA loading callback 에서
scene.createElement(xrFrameSystem.XRMesh,{})를 사용해 simple geometry 를 생성하고easyar-occlusionmaterial 을 부여합니다.참고
easyar-occlusionmaterial 의 loading, registration, deregistration, unloading 은 AR Session 이 제어합니다.
```ts
handleEmaResult(ema: easyar.ema.v0_5.Ema) {
    let blockHolder: easyar.BlockHolder = session.blockHolder;
    ema.blocks.forEach(emaBlock => {
        const blockInfo: easyar.BlockInfo = {
            id: emaBlock.id
        };
        // 若 Block 节点不存在,创建 Block 节点
        blockHolder.holdBlock(blockInfo, easyarPlugin.toXRFrame(emaBlock.transform));
    });
    ema.annotations.forEach(annotation => {
        if (annotation.type != mega.EmaV05AnnotationType.Node) {
            return;
        }
        const nodeAnnotation = annotation as easyar.ema.v0_5.Node;
        const xrNode: xrfs.XRNode = easyarPlugin.createXRNodeFromNodeAnnotation(nodeAnnotation, blockHolder);
        const emaName: string = nodeAnnotation.name;
        const geometryStr: string = nodeAnnotation.geometry === "cube" ? "cube" : "sphere";
        const assetInfo = AnnotationMetaData[nodeAnnotation.id as keyof typeof AnnotationMetaData];
        let model: xrfs.Element;

        if (assetInfo) {
            // GLTF部分
        } else {
            model = scene.createElement(
                xrFrameSystem.XRMesh,
                {
                    // 使用插件注册好的遮挡材质
                    material: "easyar-occlusion",
                    // 使用 xr-frame 内置几何体,此处也可以直接使用 "cube"
                    geometry: geometryStr,
                    name: emaName,
                    "receive-shadow": "false",
                    "cast-shadow": "false"
                    // 注意不要修改 Scale
                }
            );
            xrNode.addChild(model);
        }
    })
}
```
<video src="https://doc-asset.easyar.com/develop/wechat/mega/media/occlusion03.mp4" style="width:480px; max-width:100%; height:auto;" muted playsinline controls></video>

> occlusion 이 있으면 이 판다가 wall 뒤에서 춤출 수 있습니다.
Complex geometry 로 occlusion 배치하는 방법
비정형 장비나 불규칙한 건물처럼 고정밀 occlusion이 필요한 시나리오에 적합합니다. 매핑 결과의 마스크 파일을 사용하거나 Unity의 Mega Studio를 통해 Block dense model을 내보낸 뒤 잘라내고 face reduction하여 occlusion용 white model을 얻을 수 있습니다.
매핑 결과의 마스크 파일 사용
cloud localization database 의 Mask file download 항목을 통해 매핑 결과의 glb 마스크 파일을 다운로드하여 자릅니다. 잘라낸 모델은 xr-frame에서 로드할 때 Y축 회전이 필요하지 않습니다.
참고
이 방식은 mapping version 9.6 이상의 매핑 결과에만 적용됩니다.
Block을 cloud localization database에 추가한 뒤 해당 Block ID를 기록하고, 해당 Block 행의 Action 열에서 Mask file download 를 클릭합니다.
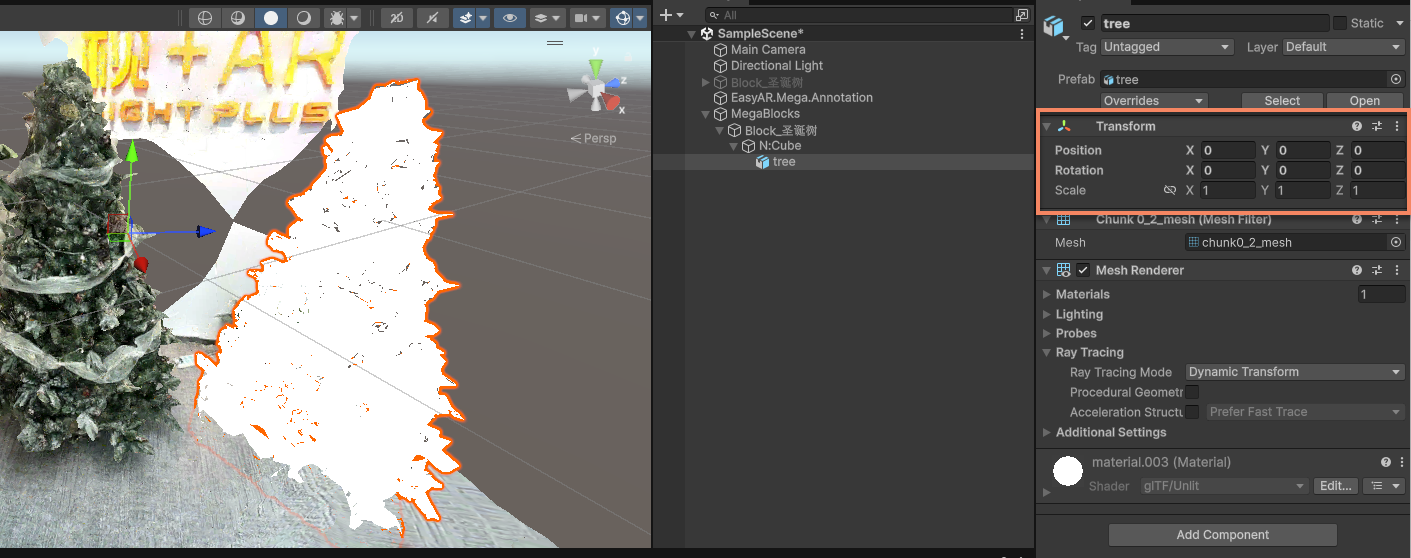
팝업에서 Low precision 을 선택하고 해당 Download 버튼을 클릭하여
glb마스크 파일을 다운로드합니다.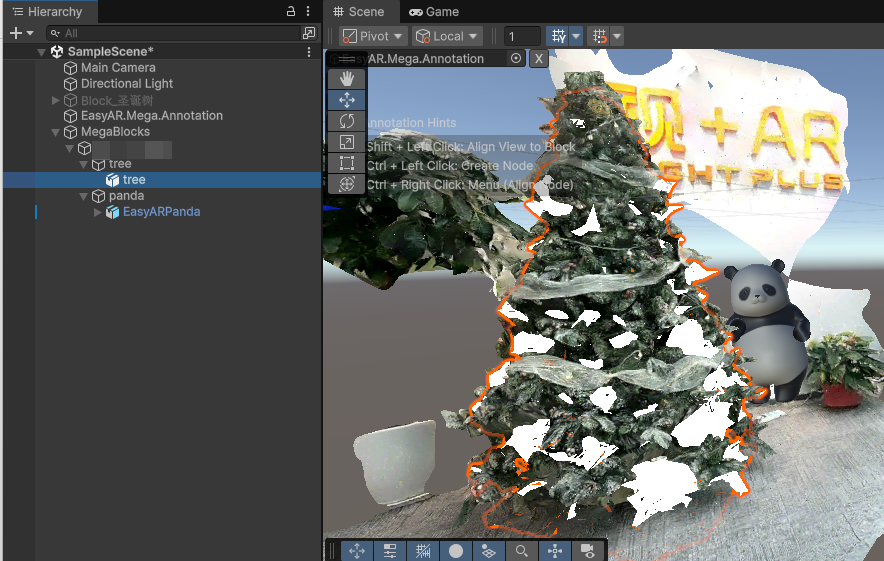
Blender와 같은 디지털 콘텐츠 제작 소프트웨어에서 다운로드한 모델을 엽니다.

모델을 잘라 occlusion에 필요한 부분만 남기고
glb형식으로 저장합니다. 원래 position, rotation, scale, coordinate system은 유지합니다.
잘라낸
glb파일을 준비합니다. Mini Program이 접근 가능한 HTTPS 서버에 업로드하거나miniprogram/assets/에 넣고 상대 경로를 사용할 수 있습니다.컴포넌트 resource 설정
sampleAssets.occlusionMesh.src에 모델 주소를 입력합니다.src: "assets/occlusion_mesh_sd.glb",모델 로드와 localization이 성공하면 모델을 Block node 아래에 배치합니다. 공간 위치를 수동으로 설정할 필요는 없습니다. xr-frame runtime에서 3D 콘텐츠 로드를 참조하세요.
해당 Block의 실제 scene에서 Mini Program을 실행하고 localization 성공 후 마스크 파일을 표시하여 실제 장면과 맞는지, 가상 객체가 가려지는지 확인합니다.
Unity에서 내보낸 dense model 사용
Unity scene 에서 Mega Block node 를 클릭하고 Inspector panel 에서 BlockID 를 기록합니다.
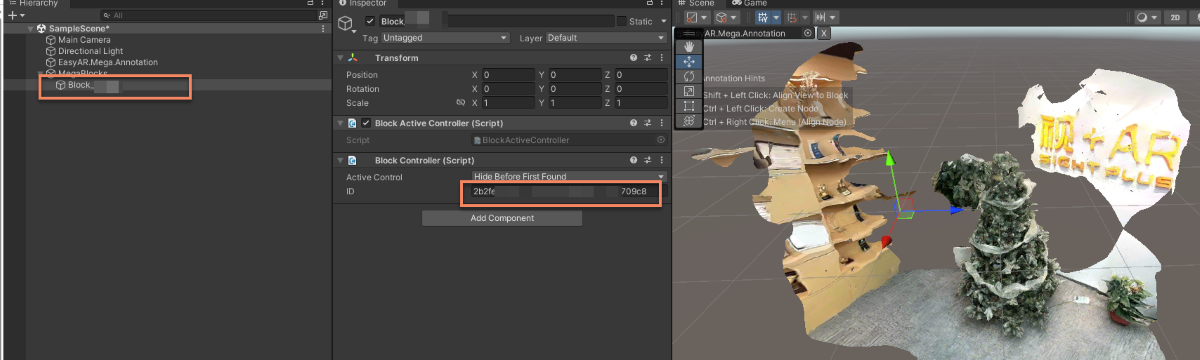
Mega Studio 의 Block 에서 export 를 선택합니다.
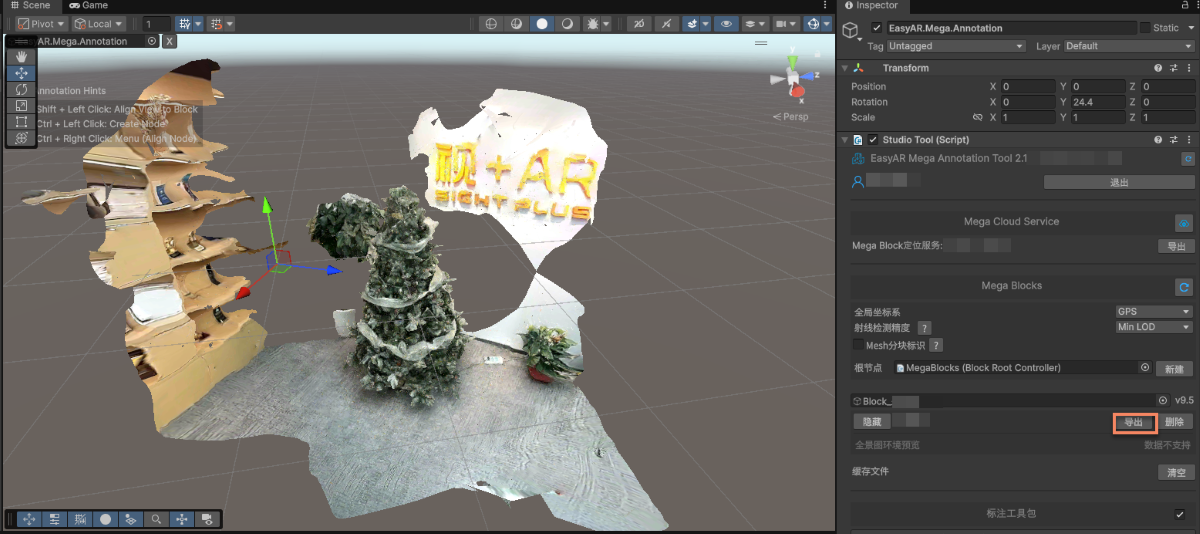
export options 를 수정한 후 export 합니다.
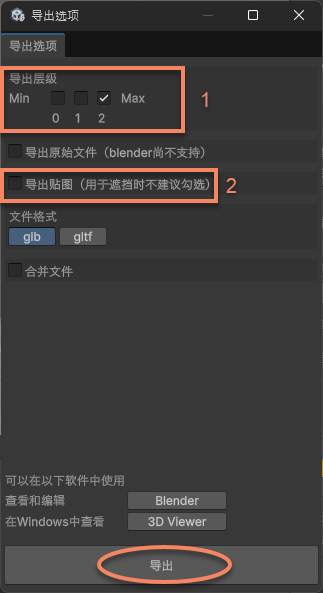
그림에서 1 은 LOD level 입니다. level 이 낮을수록 model 이 단순하고 faces 가 적습니다. 최고 precision 이 필요하면 2 를 선택하고, face count 를 줄이기 위해 precision 저하를 허용할 수 있으면 1 또는 0 을 선택합니다.
그림에서 2 는 texture export option 입니다. occlusion 으로 white model 만 필요하므로 textures 는 필요하지 않습니다.
export 된 model 을 Blender 같은 digital content creation software 에서 cropping, reduction 한 뒤
Glb로 저장합니다.팁
예제에서는 Blender 의 Decimate Modifier 를 사용합니다.
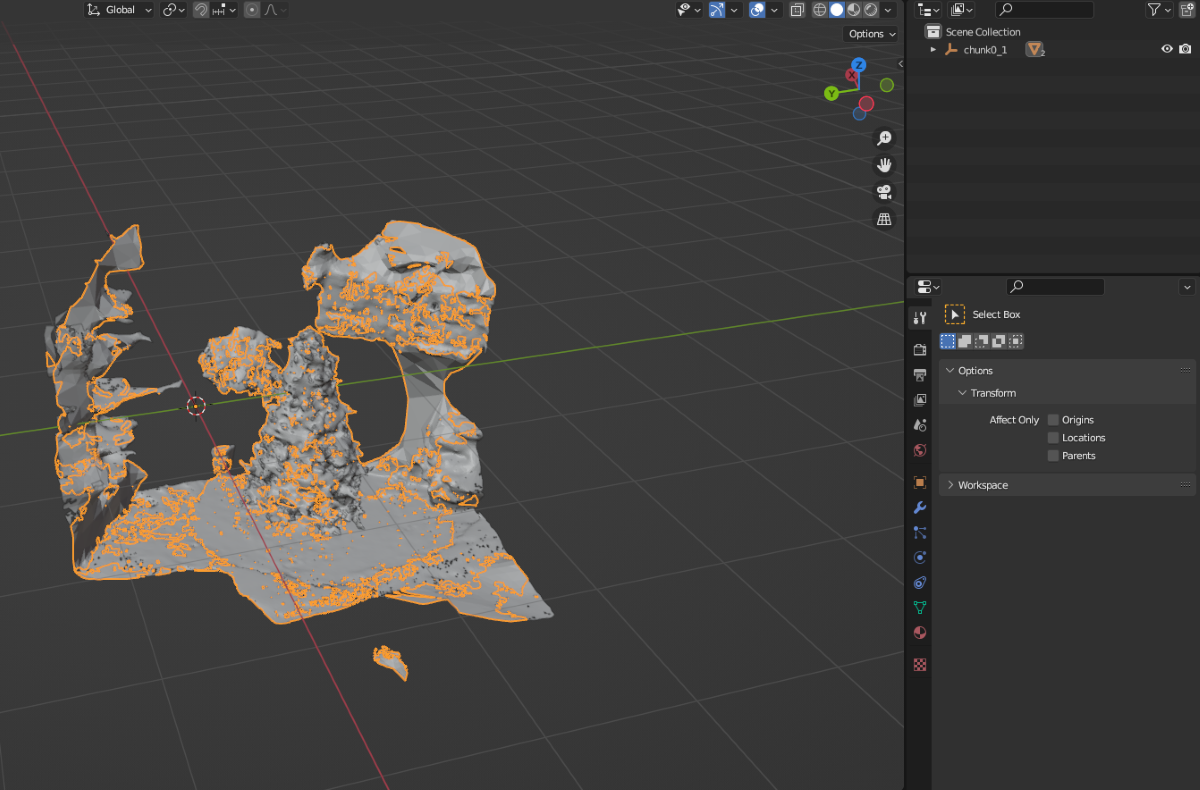
cropping 및 reduction 후:
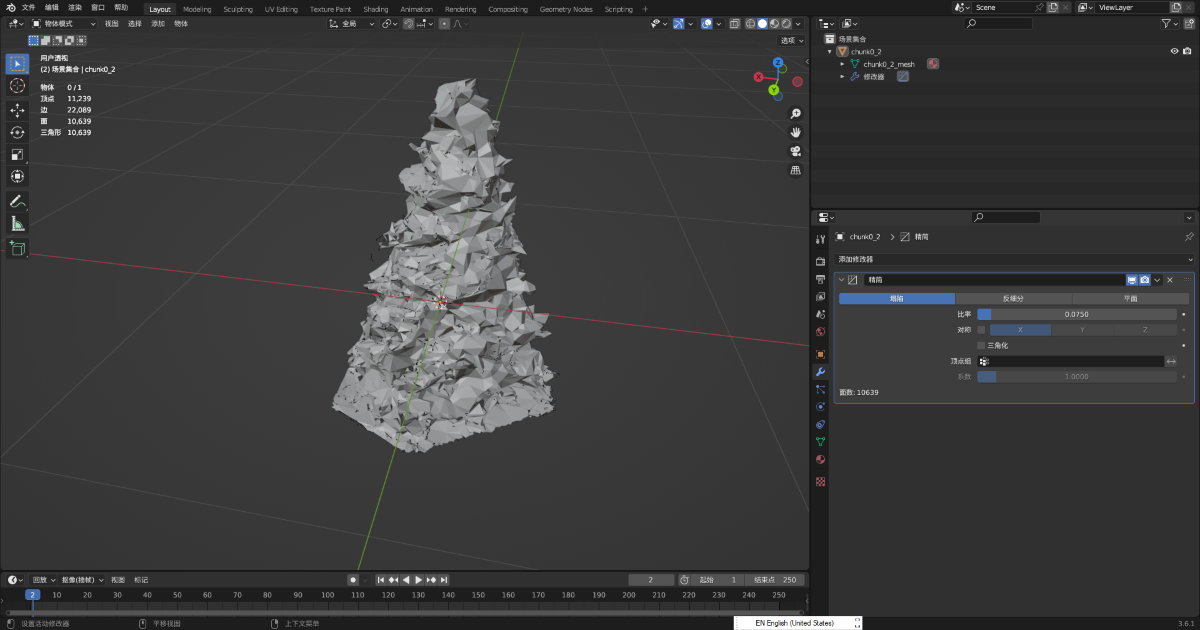
occlusion 에 사용할
Glb파일을 file server 에 mount 하여 loading 용 url 을 얻습니다.xr-frame Mini Program 에서 occlusion 으로 사용할 GLTF 를 load 합니다.
먼저 occlusion 용 GLTF model 을 load 한 다음
scene.createElement(xrFrameSystem.XRGLTF,options)를 사용해 GLTF model 을 생성합니다.assets.getAsset("material", "easyar-occlusion")를 사용해 material object 를 가져옵니다.model.getComponent(xrFrameSystem.GLTF).meshes.forEach((m: any) => {m.setData({ neverCull: true, material: occlusionMaterial });}를 사용해 GLTF model 의 material 을 수정합니다.참고
easyar-occlusionmaterial 의 loading, registration, deregistration, unloading 은 AR Session 이 제어합니다.
```ts
const sampleAssets = {
    occlusion1: {
        assetId: "occlusion1",
        type: "gltf",
        src: "url/occlusion1.glb",
        options: {}
    }
}
async loadAsset() {
    if (!scene) {console.error("Empty scene"); return;}
    try {
        await scene.assets.loadAsset(sampleAssets.occlusion1);
    } catch (err) {
        console.error(`Failed to load assets: ${err.message}`);
    }
},
addOcclusion() {
    model = scene.createElement(
        xrFrameSystem.XRGLTF,
        {
            "model": assetInfo.assetId,
            "anim-autoplay": assetInfo.animation ? assetInfo.animation : "",
            "scale": assetInfo.scale ? assetInfo.scale : "1 1 1",
            name: "tree"
        }
    );
    const blockID = "aaaa1234-bbbb-cccc-dddd-eeeeee123456" //여기에 Block ID를 입력해야 합니다
    if (!blockHolder.getBlockById(blockParent.id)) {
        // 기존 Block 노드가 없으면 하나 생성합니다
        blockHolder.holdBlock({
            id: blockID
        })
    }
    // xr-frame scene의 Block 노드 가져오기
    let blockElement = blockHolder.getBlockById(blockParent.id).el;
    // 잘라낸 오클루전 모델을 Block 노드 아래에 자식 노드로 연결합니다
    blockElement.addChild(model);
    /**
     * GLTF 로더의 동작이 서로 다르므로 xr-frame에서의 모델 방향이 Unity의 렌더링 결과와 완전히 일치하도록 하기 위해,
    * 로드된 모델을 제자리에서 Y축 기준으로 180도 회전해야 하는 경우가 있습니다
    */
    let modelTransform = model.getComponent(xrFrameSystem.Transform);
    let currentRotation = modelTransform.quaternion.clone();
    let targetRotation = currentRotation.multiply(new xrFrameSystem.Quaternion().setValue(0, 1, 0, 0));
    modelTransform.quaternion.set(targetRotation);
    //주의: Transform을 수정한 뒤에 반드시 머티리얼을 수정해야 합니다
    if (assetInfo.assetId == 'occlusion1') {
        //Mega 플러그인이 제공하는 오클루전 머티리얼 가져오기
        let occlusionMaterial = scene.assets.getAsset("material", "easyar-occlusion");
        //오클루전 머티리얼 수정
        model.getComponent(xrFrameSystem.GLTF).meshes.forEach((m: any) => {
            m.setData({ neverCull: true, material: occlusionMaterial });
        });
    }
}
```
> [!NOTE]
> 여기서 Mega Block dense model 을 cropping 한 뒤 occlusion 으로 사용하는 경우 spatial position 동기화를 위한 annotation 이 필요하지 않습니다. Blender 같은 digital content creation software 에서 coordinate system definition 을 변경하지 않고 model 을 reduce 및 cropping 할 수 있기 때문입니다.
>
> 직접 제작한 GLTF model occlusion 을 정확히 배치해야 하는 경우 [space 와 정렬된 occlusion model 을 배치하는 방법](./sample.md#wechat-mega-sample-precise-occulusion-model)을 참고하십시오.

최종 real-device running effect 는 문서 상단의 video 를 참조하십시오.
Expected occlusion effect
xr-frame Mini Program 에서 occlusion effect 는 주로 다음 요소의 영향을 받습니다.
- localization tracking 자체의 accuracy
- model 배치 accuracy
- simple geometry 가 아닌 경우 model 자체의 accuracy
localization drift 시 몇 cm 정도의 misalignment 가 발생하는 것은 정상입니다.
occlusion model 의 faces 가 너무 많으면 performance 에 영향을 주기 쉽습니다. 필요한 영역에서만 사용하고 가능한 한 simple geometry 를 occlusion 으로 사용하는 것을 권장합니다.